You can use this to cut reinforcing bars, wood with metal in it, pipes, paving slabs, plastic and masonry.
However, the angle of the cut is pretty limited. A chop saw can only make straight and precise cuts, even square cuts. Yet it can cut fast and accurately across a wide range of materials from wood to metals.
It is also very easy to operate and consistent in its cuts.
Learn More: How To Use A Chop Saw
If you’re looking to buy your own chop saw, make sure to do ample research. Ask yourself what you need, based on your work routines. Make sure to think before you buy lest you suffer buyer’s remorse over an unsatisfactory tool.
To help you in your decision-making, Ryker Hardware presents this handy buyer’s guide on the Best Chop Saws in 2020. Our team has browsed over the chop saws market and collated the top 10 best chop saw models. In this guide, we have included accurate product reviews of each chop saw so you can start choosing which one to buy.
At A Glance:
Evolution Power Tools EVOSAW380 |
Porter-Cable PCE700 |
DeWalt D28710 |
Lion Tools Toolman 8350 |
BEST OVERALL |
BEST BUDGET |
BEST HEAVY-DUTY |
BEST MINI CHOP SAW |
WEIGHS 55 pounds |
WEIGHS 32 pounds |
WEIGHS 45 pounds |
WEIGHS 27.2 pounds |
up to 1450 RPM rotation speed |
3,800 RPM |
4,000 RPM |
3,800 RPM |
WARRANTY PERIOD: 3 YEARS |
WARRANTY PERIOD: 3 year limited warranty |
WARRANTY PERIOD: 1 year |
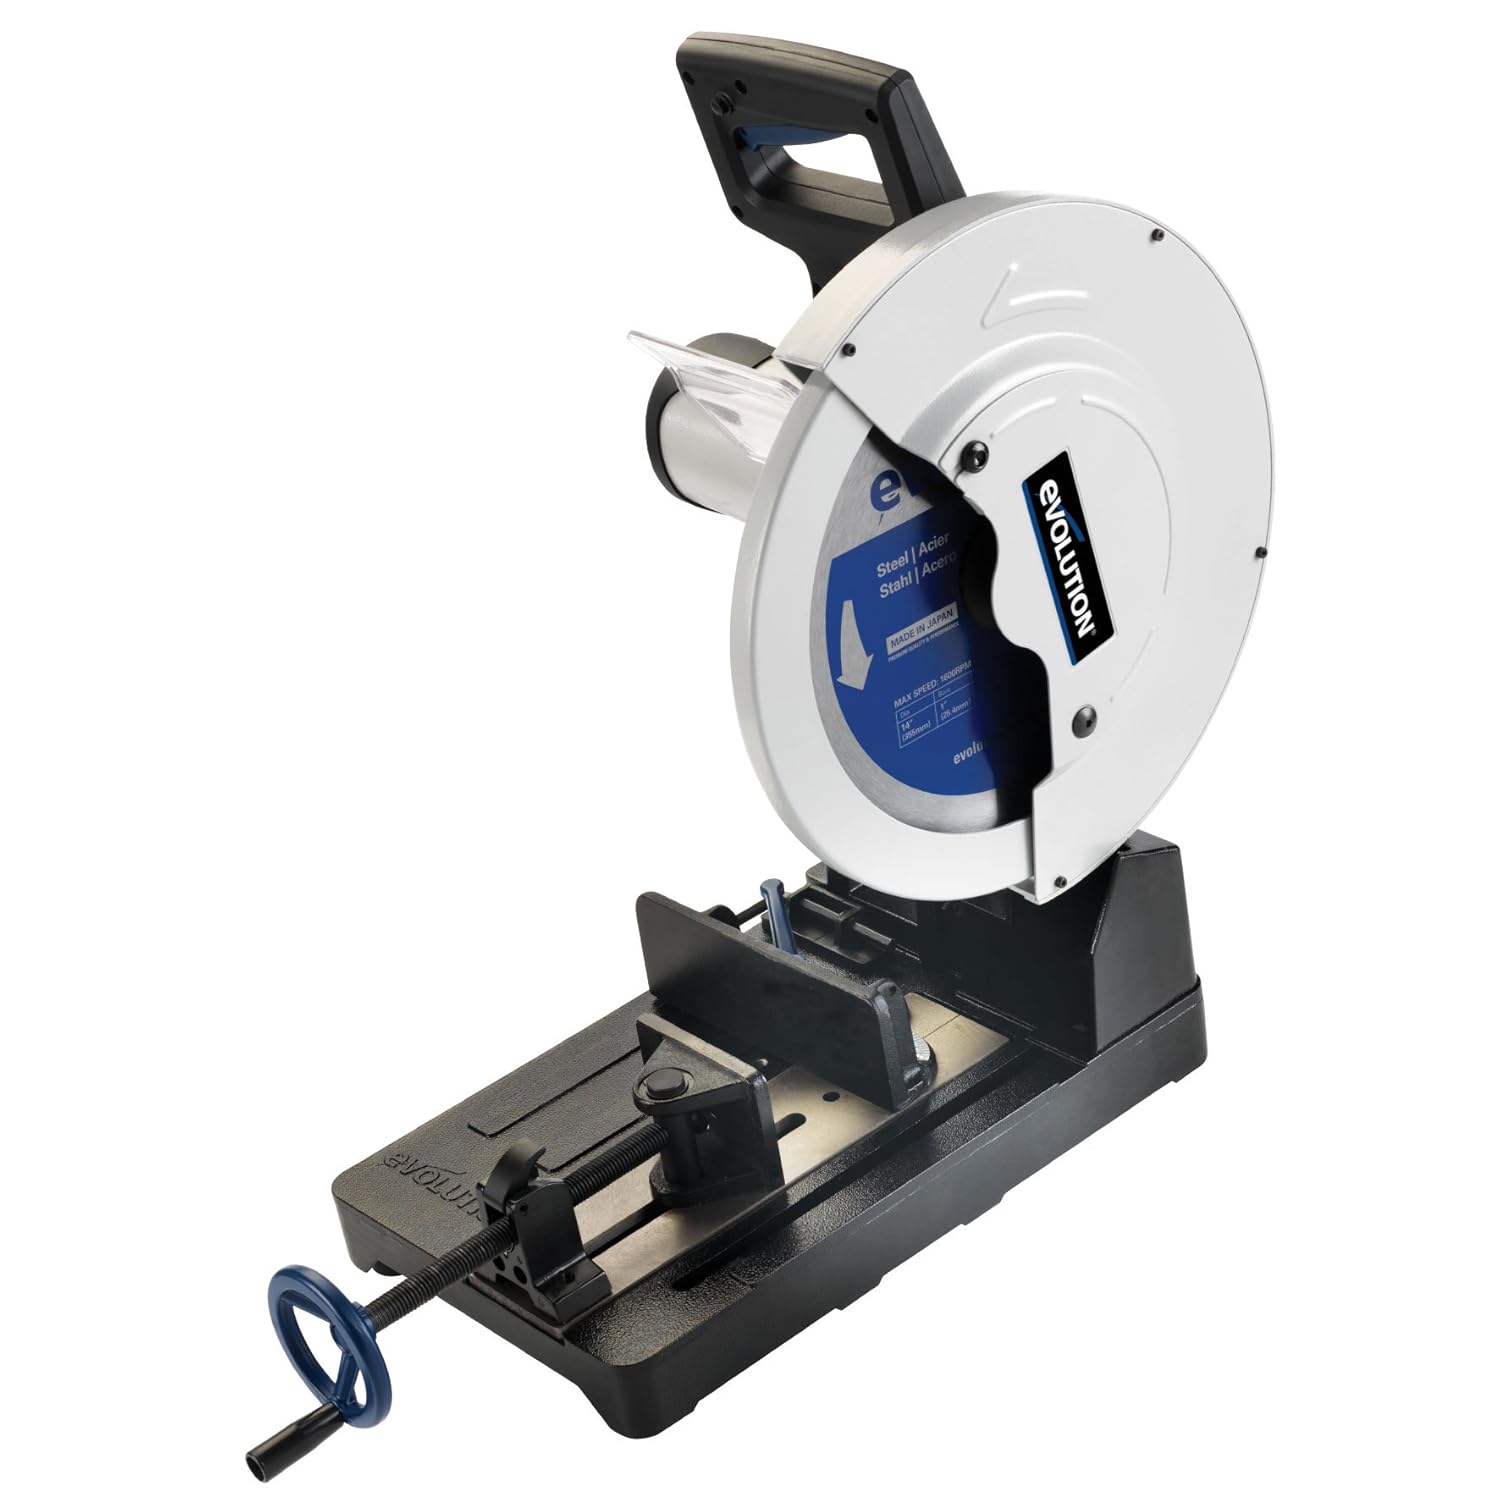
Evolution Power Tools is a strong power tool company. It offers various different models in its chop saw line, two of which have made into our list.
The Evolution Power Tools EVOSAW380 is very powerful and efficient, given it has the largest blade size out of all chop saws in this list. It works with a 15-inch blade that is powered by its 15 amp motor. It works fast with a 1450 RPM speed.
It also boasts the following features
What we liked about it
What we disliked about it
Ryker Hardware’s Rating: 9.8 out of 10 (Great!)
The PORTER-CABLE PCE700 is great for lighter-duty applications. It’s a beginner’s chop saw, so to speak. With a 14-inch abrasive blade, it can cut most ferrous and non-ferrous metals.
It also boasts the following features:
What we liked about it
What we disliked about it
Ryker Hardware’s Rating: 9.0 out of 10 (Excellent!)
DeWalt is a pioneer in power tools. Among its many high-performing tools are chop saws. Two of DeWalt's chop saws appear in this list for their high quality.
DEWALT D28710 is a heavy-duty chop saw, great for many tasks from metal to masonry cutting. It suits a wide range of abrasive wheels. Equipped with inbuilt blade change wrench storage, this tool is very easy to handle.
It also boasts the following:
What we liked about it
What we disliked about it
Ryker Hardware’s Rating: 9.0 out of 10 (Excellent!)
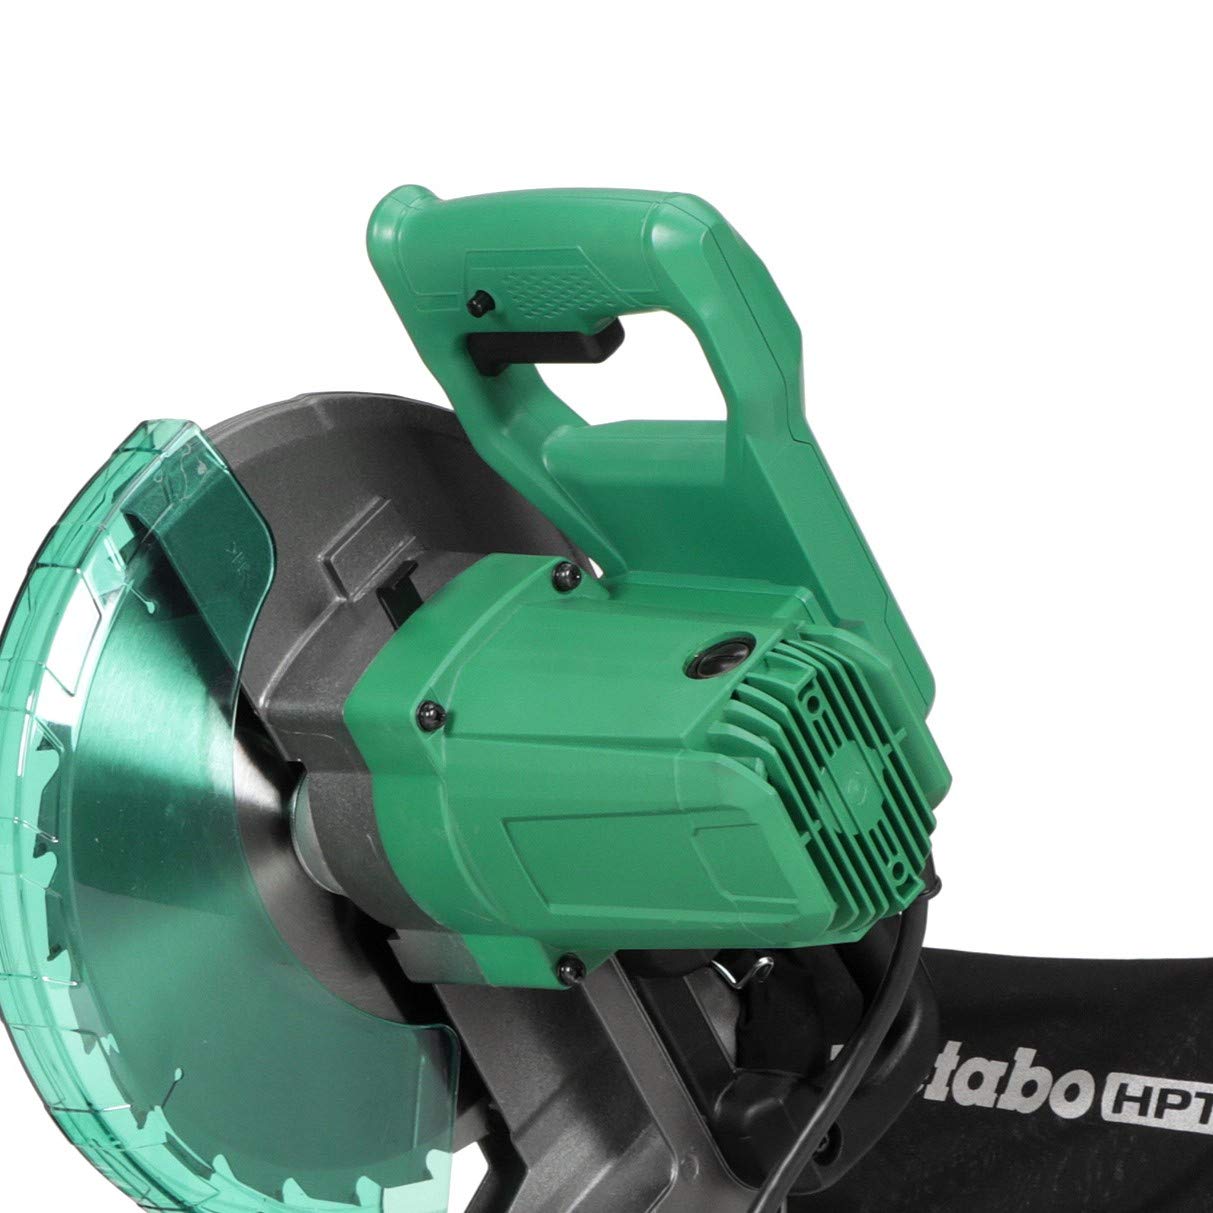
Hitachi Power Tools may have been renamed as Metabo HPT but it retains the world-class quality it has as a premium power tool brand.
Metabo HPT presents a chop saw for the beginner workmen. The Metabo HPT C10FCGS’ cutting range is vast and flexible: 0°-52°, to the right and left. It is well-supported by a table with vice clamping system to secure work piece. Its 15 Amp motor delivers high power for the toughest of cuts.
It also boasts the following features:
What we liked about it
What we disliked about it
Ryker Hardware’s Rating: 9.0 out of 10 (Excellent!)
DeWalt is a pioneer in power tools. Among its many high-performing tools are chop saws.
The DeWalt D28715 works through powerful 15 amp motor that offers a great cutting performance. You can use this to execute quick, accurate crosscuts. Through a 15 amp, 5.5-horsepower motor with overload protection and a no load speed of 4,000 rpm, this DeWalt saw can power through tough applications.
At 39 pounds, this 21-inches long saw is lightweight and portable. It is very easy to carry from one place to another.
This 14-inch chop saw with Quick-Change comes with a DEWALT warranty package that includes a three-year limited warranty, a one-year free service contract, and a 90-day money-back guarantee
It also boasts the following features:
What we liked about it
What we disliked about it
Ryker Hardware’s Rating: 8.8 out of 10 (Very Good!)
Makita is a time-tested brand of power tools and masonry equipment. It has everything a handyman needs to do construction and home improvement tasks.
Among its high-performing products is the Makita LC1230 12-Inch Metal Saw. It excels in executing in delivering fast, precise cuts. This makes it great for beginners and seasoned workers to use.
It cuts four times in light pipe, angle iron, tubing, conduit and channel than abrasive cut-off saws.
It also boasts the following features:
What we liked about it
What we disliked about it
Ryker Hardware’s Rating: 8.7 out of 10 (Very Good!)
Looking for a multipurpose saw for cutting both hard and soft materials? Get the Evolution Rage 4. With this, you can materials such as wood with nails, plastics, steel, and aluminum.
With this saw, you can execute accurate and clean cold cuts quickly. It works through a strong 1250W (120V) motor that generates high torque without any burdening load on the engine.
It also boasts the following features:
Ryker Hardware’s Rating: 8.5 out of 10 (Very Good!)
Another solid offering from Evolution Power Tools, the Evolution S355CPSL is a high-performing cutter. This metal cutting chop saw works through a powerful 15 Amp motor and state of the art dry-cut technology.
Its premium tungsten carbide-tipped blade outperforms abrasives, cutting metals squarely and smoothly every time into workable finish.
It also boasts the following features:
Ryker Hardware’s Rating: 8 out of 10 (Very Good!)
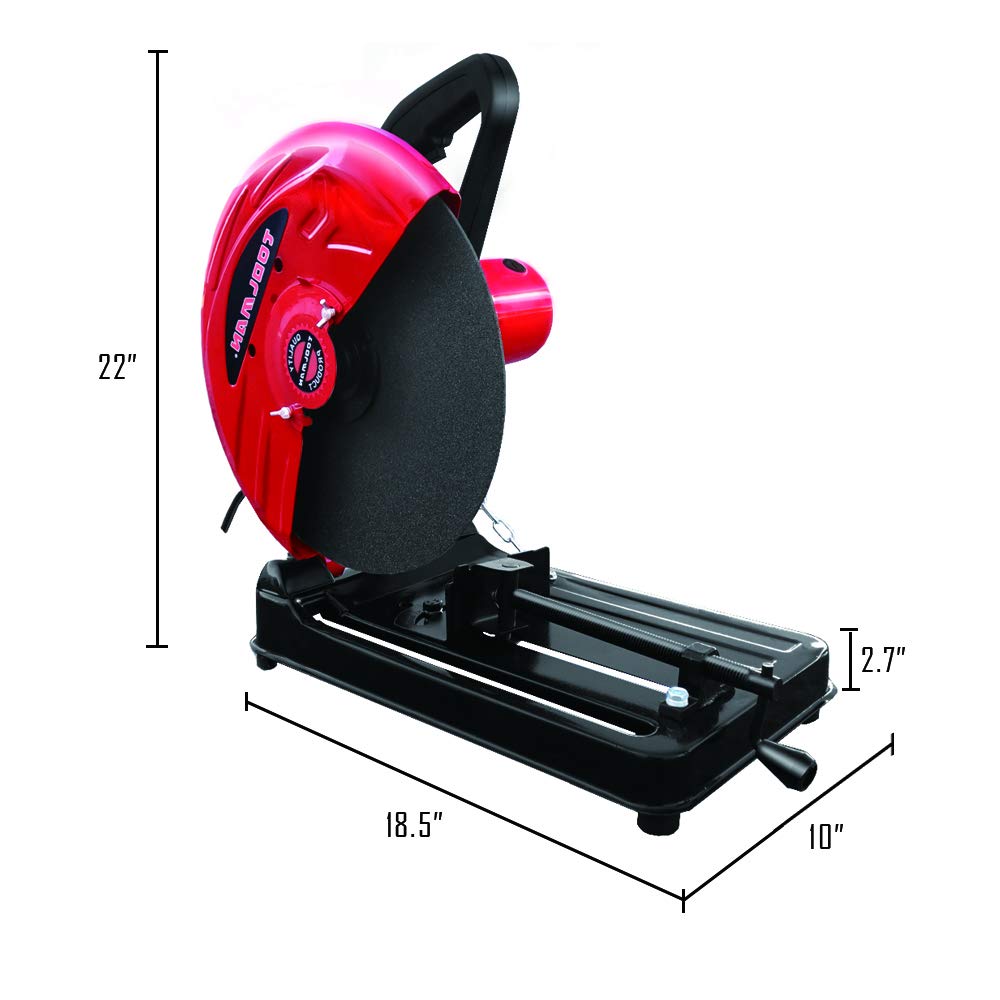
Need a multicutter saw at an affordable price? Consider the Toolman 8350. Although it’s the new kid on the block, Lion Tools offers a solid metal chop saw. It executes fast, precise, virtually burr-free cuts. Its 14-inch cutting blade is of durable carbide.
It also boasts the following features:
What we liked about it
What we disliked about it
Ryker Hardware’s Rating: 7.5 out of 10 (Fair)
Milwaukee is a long-established brand and pioneer in the power tool industry. Hence, its 13-Amp 6370 metal chop saw makes the cut in Ryker Hardware’s Best Chop Saws of 2020.
Milwaukee 6370-21 13 Amp 8-inch metal cutting circular saw delivers faster, cooler, cleaner, more affordable metal cutting. Made with the latest dry-cut technology, you get a virtually spark-free wake and cool, burr and scorch-free edges that don't require post-cut finishing.
It also boasts the following features:
What we liked about it
What we disliked about it
Ryker Hardware’s Rating: 7 out of 10 (Good!)
Chop saws are versatile staple tools for the construction workers, craftsmen, and home renovators. They can cut many types of materials from wood to metals. Depending on your work load and the materials you plan to cut through, you will find a chop saw just right for your needs.
If you want a high-performing chop saw for both light and heavy-duty tasks, we recommend the Evolution Power Tools EVOSAW380. With its strong 15-amp motor and sharp steel 15-inch blade, you can cut metals flawlessly without any burrs. You are also protected by Evolution’s iron-clad 3-year warranty and reliable customer service.
But if you just need a small chop saw to start with, you can go with the Lion Tools Toolman 8350. Coming from the new kid on the power tool block, you can rely on it for fast, accurate, burr-free cuts. It works through a powerful 15-amp motor and a long 6.6 feet power cord for easy maneuverability.
Hopefully this guide will help you create an informed decision and choose the right chop saw to work on.
Want to know more about chop saws and similar power tools? Go to Ryker Hardware. Ryker Hardware prides itself as the brand of premium quality tools at affordable prices. We also offer comprehensive guides from product reviews to how-to guides.
]]>For professionals and beginners alike in the construction and home improvement industry, the oscillating multi-tool is the go-to tool. It acts akin to a Swiss Army Knife through its diverse set of applications. The OMT is great to work on a variety of materials from wood to metals to concrete.
Bathroom and kitchen fitters, joiners, electricians and plumbers are just a few of the people who use multi-tools in their work routines. Using the oscillating multi-tool saves them a lot of time, money and effort in any particular task.
Regardless of the brand, every oscillating tool comes with blades and accessories to equip it with for any task you plan to use it on. To take full advantage of your OMT, you need to attach the right blade to it. If it’s not the right blade for the task and material you’re working on, you risk broken materials and broken tools.
Having the right blade matters a lot when you work with an oscillating tool. You need to choose well when it comes to the blades you will equip in your OMT. One way to start searching is to look for a good, respected brand that makes oscillating tool blades. One such brand is Fein. It is a long-trusted manufacturer of multi-cutter saw blades and oscillating tool accessories. It is a pioneer in the industry so you can trust their products to work efficiently.
In this guide, the Ryker Hardware team presents you this guide on Fein’s Multi-Cutter Saw Blades. We endeavor to help you choose the blades for your oscillating tool from Fein’s Multi-Cutter Saw Blades. These blades are exactly designed for every application and material.
Fein Multi-Cutter Saw Blades and accessories are suitable for most oscillating multi-tools, including models made by Bosch, Makita, RIDGID and DeWALT. Being familiar with these blades and which to choose for each task and material is one of the crucial steps towards mastering the skills that your oscillating tool can perform.
Read on to learn how to choose which saw blade accessory to use on your multi-tool.
Fein has four popular saw blade accessories with varying compositions, functions, and material specialties.
Perfect for materials such as hard and soft wood up to 50 millimeters, plasterboard, MDF, soft plastics, aluminum, copper and sheet metal, the Fein E Cut Universal Blade cuts through these materials easily. It is a strong bi-metal blade with its front cutting edge looking the same form as a hacksaw blade.
This multi-cutter blade provides a wider cut of 44 millimeters, comparably greater than the 35-millemeter standard of other blades. While it easily cuts wood, it is the best for cutting metals.
This blade is also the same as the Universal Blade in its bimetal or hardened metal composition. But it is known as an amazing “all-rounder accessory” by Fein. It can handle a wide variety of materials from soft and hardwood, chipboard and MDF, to metal like nails or copper pipe.
The Fein E Cut Longlife BiMetal Wood Blade can cut hard and soft wood up to 50 millimeters thick, plasterboard, MDF, soft plastics and nails and copper pipe.
Unlike the previous two blades, the Fein E Cut Precision Saw Blade is not a bimetal blade. This means that this cannot handle metals well. If you’re cutting into wood with nails, be careful using this because the teeth of the blade can bend and break. This blade is best for cutting wood (up to 55 millimeters), plasterboard, and soft plastics.
The cutting style of this blade gives the blade its name because it is quick and aggressive. This mechanism is enabled by the two rows of high-profile teeth. These teeth with large spacing in between are great for cutting hardwoods, chipboard and MDF. You can use this to efficiently create plunge cuts.
This is the basic blade in Fein’s arsenal of E Cut Multi-Cutter Saw Blades. It is perfect for cutting wood (up to 55 millimeters), plasterboard, and soft plastics. But one must be careful when cutting through material with nails or metal components because this is not a bimetal blade.
The Fein E Cut Standard Wood Blade works efficiently through fine teeth that provide quality cuts through wood, plasterboard, and soft plastics. These cuts are smoother and cleaner due to a less aggressive cutting style. But it works slower than the Fein E Cut Precision Blade.
It works best in creating clean plunge cuts, trimming skirting boards, or cutting through door stops when you’re laying flooring.
These multi-cutter saw blades from Fein are just a few of the many oscillating tool blades in the market today. Since their inception, Fein blades and accessories help workers use their power tools in home improvement and woodworking tasks. There are also other brands that manufacture great saw blades. But if you need high-quality blades, you can start by getting Fein Multi-Cutter Saw Blades.
To learn more about oscillating tools and how to take advantage of them, go to Ryker Hardware. Browse through our articles from how-to guides to product reviews.
We have sold more than 350,000 saw blades all do to your support and confidence in the quality of products we sell and service we provide. Here at Ryker Hardware, we are focused on providing quality products at affordable prices to fit everyone's budget. We source our saw blades from the same factories that many of the Big Brands use and pass our savings directly to you.
]]>
Each task necessitates a different accessory to complement the function of the oscillating tool. The key to a well-done task with an oscillating multi-tool is to attach the right accessory into it. There is no mincing words here. You cannot use any other oscillating blade except the right one for the job, whether it’s quick or long one.
Wood is one of the most common materials for workmen to cut. They can use it to create furniture, boxes, and other woodworks. To be efficient in wood cutting, every worker should only use oscillating blades meant to cut the material.
For starters, here are three of the best oscillating blades to use for wood cutting, whether as a DIYer or a professional. (in no particular order)
Worried about constant blade breakages while pulling out nails from wood? Worry no more! You can avoid a perilous accident with a wood cutting blade capable of cutting those pesky nails – the Titanium BiMetal Oscillating Saw Blade for Wood with Nails. This titanium-coated blade is designed to cut hardwoods, plywood, nails, screws, wood with nails, and non-ferrous metals such as aluminum, copper, brass, lead, and stainless steel. This blade is great for carpenters, construction workers, and DIY homeowners.
Carpentry and woodworking requires precise discipline in any workman. You can do best with the accurate cuts of a Japanese-style blade. This blade can make the smoothest and most accurate cuts out of all oscillating tool blades. It uses its extremely sharp teeth to aggressively cut through wood, plywood, particle board, plastic, sheetrock, drywall, fiberglass and other non-metallic materials. This is also designed to clear sawdust to quickly tackle any project.
Some types of wood are soft, in almost the same density as plaster and drywall. To cut soft material efficiently, only get a coarse cutting blade for the task. The coarse tooth configuration has larger teeth for aggressive plunge and linear cutting. With these proudly American-made oscillating blades, doing flush cuts under doors is made easy. For any beginner to expert worker, the coarse tooth blade is considered a reliable wood-cutting oscillating blade.
Whether you are a beginner or skilled professional, you will find more productive time and less hassle with an oscillating tool. Once equipped with the right blade, this multi-tool can steer towards working on numerous home improvement tasks.
If you work on wooden materials, best equip your oscillating multi-tool with blades that specialize in cutting wood. Never use any blade – that isn’t designed for wood – on wood. The three recommended oscillating blades are just a few of the accessories you can use to cut wood with an oscillating tool.
Learn more about oscillating tools before starting to use them. To know more, go to Ryker Hardware. Ryker Hardware supplies top-quality tools and blades for everyone who wants to work on home improvement or construction. Get finer production with every sharp blade! Shop at Ryker Hardware now! We offer you a 10% discount for your first order, regardless of the amount.
]]>Learn more about – Oscillating Tools: Why You Need One
The reason why the oscillating tool becomes the go to for many tradesmen are the different accessory to complement the function of the oscillating tool. Before you use the oscillating tool, make sure that you attach the right accessory into it. For starters, here are five essential oscillating tool blades for a wide range of tasks.
The HCS Saw Blade is the most common Universal Oscillating Tool Blade because most people use oscillating tools to cut though wood, drywall, plastic and PVC. If you need to cut through old wood or hardwood, your standard tooth HCS Oscillating Blade will work, but we would recommend switching to a Japanese Tooth Blade as it will cut through the material more quickly. Many flooring installers will use these blades for performing plunge cuts and undercuts.
Removing grout can be a time consuming and tedious task, particularly when you don’t have the proper equipment. While there are many types of power tools that can cut and remove grout, most of them lack the precision required to remove grout without damaging the surrounding tiles. This is where an oscillating diamond blade comes in handy.
Japanese Tooth Blades have large teeth designed to cut through wood quickly. Due to the size of the teeth, this would be the recommended blade anytime you are cutting hard wood or old wood. While a standard tooth blade could work, it will probably wear out more quickly due to the smaller teeth.
Need to remove paint, caulking or old sealant? Get a scraper blade. Ditch the knife which would take you many hours of back-breaking work. Use instead an oscillating tool equipped with a scraper blade to easily shave away old paint. This is also great in taking off carpet and tile adhesives.
Last but not least: The Bi Metal Blade. Need to cut through metal? Get this blade. This is sturdy enough to cut through pipe, nails, screws, bolts and other metal objects with ease. Bi Metal Blades tend to have smaller teeth, which makes them more durable, but tend to cut slower as the result of having smaller teeth.
An oscillating tool is an indispensable piece in any tradesman or DIYer’s toolkit. It can guide you through working on numerous home improvement tasks. You can best find its efficiency by equipping it with the right accessories for each task. The five aforementioned essential blades are just a few of the accessories you can use with an oscillating tool.
Learn more about oscillating tools before starting to use them. To know more, go to Ryker Hardware. Ryker Hardware supplies top-quality tools and blades for everyone who wants to work on home improvement or construction. Shop at Ryker Hardware now!
]]>It is the Swiss Army Knife of power tools with its versatility and number of accessories available that allow you to use it across multiple trades and the ability to work on multiple materials. With the right accessory or blade, you can work on almost any task.
Each oscillating tool, regardless of the brand, will come with blades and accessories to equip it with for any task you desire. But to really take advantage of this power tool, you need to right blade or tool.
In this guide, we at Ryker Hardware hope to introduce you to some new ways to use your oscillating tool. When people complain about a saw blade not working correctly or wearing out too fast, 99% of the time it is user error because they are not using the right blade for the job. By choosing the right blade for the job, you can ensure your blades will last longer, but you will also be more satisfied by the performance.
Oscillating tool blades are mainly categorized in the task they perform: cutting, sawing, rasping, scraping, sanding, polishing and specialty blades.
Before we take on the different types of oscillating tool blades for every home improvement task, you need to learn first about multi-tool arbors.
The arbor is the part of the oscillating blade that connects to the oscillating tool. Our most common design uses a Universal Fit Quick Release Arbor, because is compatible with more Oscillating Tools, than other options in the market. So it’s crucial for any worker who has an oscillating tool to to know what type of arbor you need for your particular tool.
Oscillating tool blades vary in size and function. They also vary in the materials they can work with. Some are made of mixed metals (BiMetal), Titanium, Diamond, and Carbide. They also differ in the teeth that each blade has.
Learn More – 5 Essential Oscillating Tool Blades
Here’s a quick overview of the types of oscillating types, based on their purpose:
Cutting
Here's a handful of our most popular oscillating saw blades.
Semi-Circular Oscillating Saw Blade
Extended Reach Wood/Plastic Oscillating Saw Blade
Bi-metal Oscillating Saw Blade
Rasping
Carbide/Diamond Blades are great for coarse sanding of tile adhesive, fillers, concrete, stone, and wood. You can find them in triangular, round and finger shapes.
Scraping
Scraper blades are available in both rigid and flexible. They remove stubborn paint, silicone, carpet or tile adhesive, undercoating, etc. You can choose scraper blades in either a wide straight blade with flexible blades or in a wider mushroom shape.
Sanding
You can also use the oscillating multi-tool as a sander. Sanding pads are available in both 4 1/2″ round and a triangular version. Find in both plain or perforated form. Abrasives are held with hook and loop system. They are made from different materials such as aluminum oxide and zirconium.
Polishing
There are felt polishing pad, Bristle fleece and/or felt and fleece polishing pads that attach to the standard backing pad by hook and loop. They work polishing chrome, stainless, aluminum, non-ferrous, polycarbonate and natural stone materials, gel coat, removing discoloration caused by heat and more.
Grout Removal
This round blade can be bought in both carbide and diamond edges. Carbide edged blades work on softer, more porous materials such as tile joints and grout, plaster, porous concrete, and deck plank sealant. The diamond edge blades also work in harder materials.
Oscillating tool blades help workers use their power tools in home improvement and woodworking tasks. You can use them to cut, saw, rasp, scrape, sand, polish different materials and remove grout. All you need is to equip your multi-tool with the right blade for the job.
To learn more about oscillating tools and how to take advantage of them, go to Ryker Hardware. Browse through our articles from how-to guides to product reviews.
We have sold more than 350,000 saw blades all due to your support and confidence in the quality of the products we sell and the service we provide. Here at Ryker Hardware, we are focused on providing quality products at affordable prices to fit everyone's budget. We source our saw blades from the same factories that many of the Big Brands use and pass our savings directly to you.
]]>The oscillating multi-tool, also known fondly as OMT, is a power tool with many functions you can take advantage of: it plunges through plywood, quickly cuts holes in drywall, shears-off metal pipes, trims moldings, grinds-out grout, sands surfaces, and much more.
The OMT’s name is derived from its working mechanism. Rather than a conventional power saw’s cutting motion, this tool cuts with oscillating vibrations. Its blade doesn’t cut or saw while spinning in a circle or back and forth like any other saw. Instead, it powers through a flat metal blade that oscillates side to side about 20,000 times per minute.
With this, it is better for corners or flat spaces than typical saws because this tool doesn’t kick-back or grab during cutting the way another saw might. It uses its small compact size to create precise curved or straight cuts in very tight spots.
When choosing an oscillating multi-tool to use in your work, it is necessary to consider the two types of oscillating multi-tools: cordless and corded.
The main difference between oscillating multi-tools are their design on portability. Cordless oscillating multi-tools are more portable due to their lack of dependence in electricity. Just get a battery in it and you’re good to go. Use new lithium batteries for power and extended life to make sure that you can use your cordless OMT anywhere. One drawback from this type of oscillating multi-tool is its shorter life than its corded counterpart due to batteries. Batteries cannot last forever. And to replace a cordless OMT battery is very expensive. Expect to cough up at least $75 for every five to ten years of use.
Corded oscillating multi-tools are generally more powerful and long-lasting. This is the reason why some cordless models also come with 20-foot or so cords when you buy them. As long as you plug them in a socket, you can work hours on them. Above all, a corded model makes the most sense unless you plan to use the tool where an electrical outlet isn’t reachable.
Learn More: Best Cordless Oscillating Multi-Tools
The Fein Tool company invented the oscillating multi-tool. Before them, it is such a hassle to repair small sections of houses without first removing those components. The tools available at that time also limit your control in working. Consider the CIRCULAR SAW, the RECIPROCATING SAW, and the jamb cutter. These are tools too powerful and uncontrollable in working in small spaces. But the oscillating multi-tool changed all that. Instead of forceful violent spinning or plunges, it vibrates simply for precise cuts.
A narrow, flat blade mounts to a platen at the end of the tool. The motor slides this blade side to side in a ½” stroke at a blinding speed, causing the teeth to gradually notch their way into the material you’re cutting. When you extract the blade, you’re left with about a 2” X 1/16” slot, very precisely placed.
Here are some of the applications you can do with an oscillating multi-tool.
The control of the saw practically lets you perform surgery on exterior casings. You can do window trim and door jambs. The saw cuts finely that new, square-cut pieces splice in with only fractional gaps. When using the OMT for this work, always make sure the saw is perpendicular to the wall, or even angled upward ever so slightly.
The constant sweeping motion helps to clear sawdust out of the cut, and thereby prevent the blade from binding up. Even so, friction against the blade is intense. Smoke sometimes issues from the cut line. If this happens, simply back the saw out and let things cool down for a second.
Another common use for the oscillating tool is efficiently cutting metal surfaces. Usually you use reciprocating saws and hacksaws here. But they are violent and bulky to use for home repairs.
You could also use mini-bandsaws as electricians and plumbers do, but few have done in their toolkits.
Using the oscillating tool to cut metal just requires switching out a blade. Metal-cutting blades for the tool have smaller, more numerous teeth, which “file” through metal.
Although not good for cutting through heavy metal, like thick steel, an oscillating multi-tool can manage light-gauge steel and aluminum. It is also effective for cutting out embedded nails. Typically, you can just “notch” the nail at its base, then break it off with a hammer, or even your fingers.
There are times when you need to cut material in a small nook or crevice of your house, office, or workspace. Then only the oscillating tool can work with you on this task. You can use this because of its compact design.
The small, cylindrical body lets you hold it more or less like a flashlight while you direct it forward into a tight spot.
In these situations, the saw is a little harder to control. The blade will tend to wander. And, the vibrations can cause it to slip out of your hand if you’re not careful. Slow, steady progress, and a good place to rest your arm, will make the work safer.
When changing doorways or pass-through openings, there is the possibility of necessary adjustments to the total size of the doorway. In this case, you also need to adjust the trim too.
For most people, they would remove the entire trim piece, take it outside, cut it on the miter saw, bring it back in and reattach it. This is such a tedious process that risks damages to the wall, the jamb, and the casing itself. There are also new nail holes and caulk lines for the worker to deal with. But now with the oscillating multi-tool, you just need to attach the necessary accessory (speed square), then cut the wall as desired.
The saw is also accurate enough to use on paint-grade casings where caulk can hide imperfections.
Lastly, you could improve on existing trims in your room with this oscillating multi-tool. This happens when installing built-ins or inserting new trim around a room. Therein you will need to “interrupt”—or cut back—existing trim to make space for any additions.
To use this well, carefully plot the location of my new built-in or opening, design the place where the old trim needs to stop, then scribe and cut the spot ahead of time with the oscillating tool. Plan in the width of your casing, possible “reveals” (an architectural detail around doors), and wiggle room for caulk lines. Lay out the cuts carefully.
With the oscillating tool, it would take easily seconds what usually would be hours of demolition, careful cutting, reassembly, and painting.
However, an oscillating multi-tool can also come with a few downsides. Understand these to work more efficiently with this power tool.
The blade on an OMT is fully exposed, with no guard of any kind, and the blades are wickedly sharp. Do not drop this! It will damage floors and even human flesh if dropped accidentally while working.
Grip the tool firmly and use one hand as needed. Avoid passing it between hands a lot. To make sure of the strength of your hands, hold the tool with both hands and do not waver during the process.
If you need to set it down, first turn it off and wait for it to wind down. Then lay it in a nearby box or rug.
The OMT saw’s motor is powerful, operating at amazing speeds. The drawback of this power is the annoying whine the tool produces when turned on. The sound is migraine-inducing that will affect your hearing for hours after use.
To avoid this risk, wear earmuffs while using the oscillating multi-tool. Keep animals and other people from your work station.
Blades of the oscillating multi-tool don’t last long. Soon after you use them in many tasks, you’ll find blunt and dull blades. But you can buy generic blades online to support your OMT, once you’ve done enough research. Factor in the make and model of your tool.
The oscillating multi-tool is one of the best tools to have in your toolkit. It can outperform other saws in home improvement, plumbing, and construction tasks. It carries many functions effectively in its compact portable body.
Learn more about oscillating tools before starting to use them. To know more, go to Ryker Hardware. Ryker Hardware supplies top-quality tools and blades for everyone who wants to work on home improvement or construction. Get finer production with every sharp blade! Shop at Ryker Hardware now! We offer you a 10% discount for your first order, regardless of the amount.
]]>Learn more about – Which Oscillating Tool Accessories – You always need
The reason why the oscillating tool becomes the go-to for many tradesmen are the different accessories to complement the function of the oscillating tool. Before you use the oscillating tool, make sure that you attach the right accessory into it. For starters, here are five essential oscillating tool blades for a wide range of tasks.
The HCS Saw Blade is the most common Universal Oscillating Tool Blade because most people use oscillating tools to cut though wood, drywall, plastic and PVC. If you need to cut through old wood or hardwood, your standard tooth HCS Oscillating Blade will work, but we would recommend switching to a Japanese Tooth Blade as it will cut through the material more quickly. Many flooring installers will use these blades for performing plunge cuts and undercuts.
Removing grout can be a time consuming and tedious task, particularly when you don’t have the proper equipment. While there are many types of power tools that can cut and remove grout, most of them lack the precision required to remove grout without damaging the surrounding tiles. This is where an oscillating diamond blade comes in handy.
Japanese Tooth Blades have large teeth designed to cut through wood quickly. Due to the size of the teeth, this would be the recommended blade anytime you are cutting hard wood or old wood. While a standard tooth blade could work, it will probably wear out more quickly due to the smaller teeth.
Need to remove paint, caulking or old sealant? Get a scraper blade. Ditch the knife which would take you many hours of back-breaking work. Use instead an oscillating tool equipped with a scraper blade to easily shave away old paint. This is also great in taking off carpet and tile adhesives.
Last but not least: The Bi Metal Blade. Need to cut through metal? Get this blade. This is sturdy enough to cut through pipe, nails, screws, bolts and other metal objects with ease. Bi Metal Blades tend to have smaller teeth, which makes them more durable, but tend to cut slower as the result of having smaller teeth.
Conclusion
An oscillating tool is an indispensable piece in any tradesman or DIYer’s toolkit. It can guide you through working on numerous home improvement tasks. You can best find its efficiency by equipping it with the right accessories for each task. The five aforementioned essential blades are just a few of the accessories you can use with an oscillating tool.
Learn more about oscillating tools before starting to use them. To know more, go to Ryker Hardware. Ryker Hardware supplies top-quality tools and blades for everyone who wants to work on home improvement or construction. Shop at Ryker Hardware now!
]]>
How does it work?
Oscillating tools have a body similar to a grinder of varying diameters. Some brands like Ridgid, Ryobi, and DeWalt have a slimmer design, which might be a better fit for someone with smaller hands. Oscillating tools work by oscillating or vibrating thousands of times per minute to produce their cutting effect. Some oscillating tools do a better job than others at reducing the vibrations felt in your hand. Fein is the pioneer in the space and their oscillating tools have the least amount of vibrations of the tools on the market.
An oscillating tool is also called a multi-tool because it is a compact, versatile power tool that is designed to tackle a wide variety of projects. It resembles an orbital sander. But unlike a sander that can only sand wood, an oscillating tool is diverse in its mechanisms. It can smooth wood, preform flush and plunge cuts, rasping, scraping, grinding, polishing, removing grout, undercuts, trimming door casings and more. Compared to other types of power saws, the oscillating tool makes less dust when cutting due to its limited movement.
The diverse functions of an oscillating tool are made possible with the accessories that they are compatible with. You can find an accessory for almost any application. Depending on the accessory, you can do efficiently do the following tasks:
Features of an Oscillating Tool
Given its distinction as a multi-tool, an oscillating tool offers a lot of features in its arsenal, depending on the brand you buy from.
One such feature is a variable-speed trigger. This gives you greater control and allows you to choose a cutting speed (as high as 22,000 oscillations per minute) that best suits the attachment and material.
Another sought after feature is tool-free blade changing is another popular feature. This is a time-saver, especially when you perform a task that needs many several different attachments used concurrently.
Third and fourth most common features are trigger locks and ergonomic grips. They help reduce fatigue over the course of an afternoon. You can also choose between corded and cordless oscillating tools.
Accessories that Accelerate the Use of An Oscillating Tool
An oscillating tool is only limited by the accessory you attach to it. Here are some of the accessories you can expect to use for almost every home improvement task.
Wood-cutting blade
Wood-cutting blades are the most basic accessory of an oscillating tool. They are best for undercutting baseboards and flush-cutting door jambs.
Bi-metal blade
Bi-metal blades have smaller teeth than the aforementioned blade. They also cut slower than wide wood cutting blades. But they are more heavy-duty with taking rugged materials. You can use this blade to cut through nails-embedded wood, unlike a wood-cutting blade that can just get damaged in the process.
Circular HSS blade
Circular HSS blades are versatile by design. Its moonlike shape enables it to cut multiple angles from a single blade position. When you need to cut a straight line, this is the blade to use. Maintain moderate speed and frequently move back and forth to avoid building up debris, causing your blade to overheat and burn the material.
Scraper knife
Scraper knives vary in widths, with both rigid and flexible varieties. The first caters to peeling tasks such as in old carpets, linolium, dried-on glue or even old gasket material. The latter removes caulking or paint.
Grinder blade
Grinder blades can handle tough material like thin-set mortar, tile adhesive, tile, cement, stone, brick and metal.
Sanding pad
Sanding pads make this tool a level-upped version of a standard sander.
Carbide grinder blade
Carbide-edged grinder blades are excellent for removing standard tile grout and create less dust than high-speed rotary tools.
How To Choose The Right Oscillating Multi-Tool
Oscillating tools vary in versatility and durability. Here are some things you need to consider when choosing which one to get for your tool kit.
A well-built oscillating tool should be able to handle both small and large projects and can handle corners and narrow spaces. Choose the one that fits your skill level and the type of tasks you plan to use it towards.
Conclusion
Oscillating tools are a great all-around tool for any tradesman to have in their tool kit. They are versatile and adaptable to any task. Just make sure that you equip it with the right accessory needed for task. In our experience, when people are not satisfied with how the oscillating tool is working, they are either using the wrong blade for the job or are using the tool incorrectly. Use this tutorial as a springboard for information gathering. Get the knowledge first then find the best oscillating tool and accessory for the job.
]]>Chisels
Chisels are available in almost any size with varying shapes and materials. If you have a tougher material, that means less time that you must spend sharpening your chisels and more time that you can work. Chisels are perfect for creating dovetails, tendons, and so much more. A craftsman can be told apart from a factory worker by use of a chisel to create intricate and precise marks. Meaning, the chisel is great for creating tight and perfect joints with less waste.
Whether you have a table mounted or handheld circular saw will depend on what you do. However, either way, you will be able to do almost anything with this tool. From creating cut offs to dados, this lightweight saw is a necessity. However, everything has positives and negatives. This saw’s weight can lead to uneven cuts and danger if not held firmly and watched carefully.
If you got married, then you might have gotten this for the wedding present from someone. It’s a home staple, woodworker or not. However, that doesn’t mean it’s only for DIYers. While a drill press might be more along the lines of what a master would need, this tool can be used by anyone and can also be turned into a drill press with the right conversion kits.
Working based on side to side movement at about 20,000 stroker per minute, this tool can be used in many ways, In fact, that’s one reason that the oscillating saw is also called the multi-tool. Some examples of what this saw can do include trimming wood, cutting openings, sanding wood, scraping off adhesive and paint, removing mortar, and creating plunge cuts. If you have this tool, you can create, refurbish, or even destroy almost anything.
Router
This hand help tool is often mounted upside down and used to hollow out pieces of wood in an area. Additionally, it can be used to cut profiles for mounding, adding decorative edges, and cutting joinery. The best feature of this tool is the ability to obtain an unlimited number of profiles so that you can meet any requirement that comes up in your woodshop.
Table Saw
As you can see, saws of many types form the foundation of the woodwork. This saw is at the center of most woodshops. Located on a large table, as the name might suggest, this is probably this biggest tool in the shop, by space is taken. As such, it’s the addition to this list showing that hand tools, no matter how important, will also be joined by their more stationary friends. Several blades can help you create your woodworking masterpieces so long as you remember to set the depth of the blade and the width of the fence. Be careful of the hands; safety is vital with a table saw.
Safety Tools
While your shop will always need a new tool to “finish the collection” it’s never too soon to add safety tools to the list. Eye protection, as well as mouth protection and even ear protection, can help protect your sight, lungs, and hearing while working in the shop. If you have the money, setting up a vacuum system to collect sawdust can go yards in creating a safer environment for you and those in your shop. If not, make sure to keep ventilation and regularly clean to avoid the many sawdust related issues.
Creating the perfect woodshop is a dream for any woodworker from novice to master of trade. However, just a few things can put anyone off to a great start, no matter the level of experience or interest within woodworking. If you are looking for blades for you oscillating saw or want advice on what saw to get, don’t forget to check out Ryker Hardware!
]]>
It’s easy to understand Milwaukee’s reasoning behind the nickname “sawzall”--since they developed a reciprocating saw that indeed “saws-all” materials. Depending on the type of blade installed on the device, a sawzall or reciprocating tool can cut through any number of materials, including lumber, metal, plywood, plastic and cast-iron pipe, among others.
Since the initial introduction of the sawzall to the power tool market, Milwaukee has built a reputation of manufacturing, robust, tough, and reliable reciprocating saws--evidenced by the fact that most people refer to reciprocating saw of various makes and models as a sawzall. In this review, we will be looking at the Milwaukee M18 Fuel 2720 Sawzall/Reciprocating Saw. So let’s jump right in.
Specs Overview
Before we look into the M18, you should understand that every Milwaukee power tool in the Fuel banner line is powered by a brushless motor. A brushless motor offers a number of operational advantages including cooler operation, longer run times, more power, and a longer lifespan of the motor itself. Now onto the review!
Milwaukee makes the Milwaukee M18 Fuel 2720 Sawzall available in various inclusions--as a bare reciprocating saw unit (model no. 2720-20); reciprocating saw with one battery, multi-charger and a case (model no. 2720-21); reciprocating saw with two batteries, multi-charger and a case (model no. 2720-22)
The Milwaukee M18 Fuel 2720 Sawzall features a stroke length of 1 1/8″, with 0-3000 SPM (strokes per minute). The M18 sets itself apart from its competition by being the fastest reciprocating saw in its category (about 30% faster), providing two times runtime, and offering five times longer tool life. The fundamental drivers behind the M18’s unparalleled power and run time is the combination of its FUEL brushless motor, RedLithium XC Li-Ion battery pack, advanced electronics.
The FUEL brushless motor drives the M18 to deliver significantly faster-cutting speeds and better durability when compared to the competition. The M18 features Milwaukee’s proprietary Redlink Plus Intelligence that comes with this latest addition of fuel reciprocating saw from Milwaukee is the Redlink Plus Intelligence that optimizes the M18’s performance while providing advanced overload protection. Additionally, to avoid sudden shut shutdowns, the RedLithium XC battery pack also sports that provides information as to how much power is left in the tank.
The Milwaukee M18 Fuel 2720 Sawzall features a tool-free Quick-lock blade change system that allows for hassle-free blade changes in a matter of minutes. Milwaukee’s Quick-lock system features a heavy-duty spring action mechanism that inspires confidence in terms of securely locking the blade in place--and avoiding accidental blade release altogether.
Milwaukee engineered the M18 with a gear-protecting clutch that protects the tool from common wear and tear and abuse in the workplace. The M18 gear-protecting clutch allows the M18 to be at its best for a longer period. The M18 also sports superior and debris protection seal that prevents unwanted materials from entering the gear housing. The Milwaukee M18 Fuel 2720 Sawzall comes with an adjustable shoe that makes for an extended blade life as well as overall better access to different areas of the blade.
Among the many advantages of a cordless sawzall like the M18 is its compact size--18½ inches, 8.9 pounds. The M18 is a convenient tool to use in tight environments such as in cabinets or in the ceilings. The M18 features a streamlined design--mainly because of the prominent over-mold that’s designed to protect most parts of the tool, almost like an armor. Additionally, the M18 over-mold also provides a number of ways in which the user can securely hold the tool.
Low light visibility is another important thing to take into consideration when working in tight spaces such as cabinets and ceilings. The M18 Sawzall includes an integrated LED lamp in the saw to help improve low light visibility the cutting area. While the solitary LED isn’t exactly blindingly bright, it is definitely a welcome inclusion especially on a tool that often lends itself to home improvement application and in darker nooks and crannies of the house.
Lastly, the M18 Fuel Sawzall comes with a very handy rafter hook that allows you to stow the tool off the floor when needed.
Recommendation
Milwaukee M18 Fuel 2720 Sawzall is a robust, powerful, and reliable piece of equipment that can greatly improve safety and productivity in the workplace. You can now climb up onto a roof without worrying so much about tripping over a power cord. The M18 is a piece of pro-grade equipment that packs the same punch as that of a corded tool. Setting you back $199 for the bare tool or $299 for a kit with one battery, Milwaukee M18 Fuel 2720 Sawzall is a lot of power tool for not a lot of money. The M18 is highly recommended for people who depend on their Sawzall all day long as it ultimately delivers the power and performance of a corded tool with the flexibility, efficiency, and convenience of a cordless model.
]]>When it comes to trusted table saw manufacturers, DeWalt has built a solid reputation of creating a tool that are powerful, dependable and reasonably priced. Almost nobody can argue that DeWalt is among the very best brands of table saws in the market. For almost a century, DeWalt has been leading the charge when it comes to innovating and manufacturing woodworking products that have become the industry standard.
Speaking of table saws, the DeWalt DW745 Compact Job Site Table Saw is an attractive option for both amateur and professional woodworkers alike. While the DeWalt DW745 isn’t necessarily the company’s top-of-the-line job site table saw, it’s definitely a formidable competitor in the 10” portable table saws market. While it doesn’t have all the bells and whistles that you’ll get on more expensive models that will set you back hundreds of dollars more, the DeWalt DW745 sports carefully considered functionalities and is built to the same high-quality standards of any DeWalt product. Let’s take a closer look at the DeWalt DW745 Compact Job Site Table Saw.
Specs Overview
The Compact Table Saw is powered by a 15-amp torque motor that is capable of powering through a wide range of woodworking applications. You can count on this tool to cut through anything--from hardwood to processed beams to pressure-treated lumber. The motor rotates the blade at 3,850 rpm and delivers 1850 watts of power. We have found that the DeWalt DW745 has enough power to even cut through some heavy-duty jobs. In our experience, the blade is able to deliver smooth and professional cuts even when used on thick and high-density material. The DeWalt DW745 features a 10-inch 24-tooth carbide blade, giving it a rip capacity of up to 3-1/8″ at a 90 degree and 2-1/4″ at 45 degrees.
For maximum control and accuracy, the DW745 Job Site Saw features a metal T-fence that can be conveniently be moved across along the telescopic fence rails. The fence can be locked in placed with the locking system. The telescopic fence allows the tool to be adjusted and fine-tuned according to both the workspace and the user’s personal preferences
Among the most important elements that the DeWalt DW745 brings to the table is unparalleled portability. Weighing only 45 pounds, this table saw unit can easily be carried from job site to job site without issues. Its compact dimensions allow it to easily fit in the back of your truck, trailer, and garage.
One noteworthy thing about the DeWalt Table Saw is that it is designed with a tool-free adjusting system which makes everything about the unit easily adjustable without using any additional tools.
The safety mechanisms on the DeWalt DW745 are pretty solid. There are a number of safety precautions in place so that the risk of injury is reduced to the minimum. Among the most elaborate safety features of the device is the location of the power switch which sits at the front of the unit for easy access in case of an emergency. Additionally, the rolling bars are wide and sit flush to the ground allowing for maximum stability. There is also a transparent blade guard that keeps your fingers away from the blades at all times. Additionally, the DW745 features a built-in riving pawl that is designed to help prevent kickbacks.
Recommendation
DeWalt DW745 retails for about $300 on Amazon. Sure, there are saws that can be purchased for less, but they aren’t exactly the best for the job site. Most table saws for the job site are priced well above the $300 mark--so the DW745 actually comes in at a great value. As far as we are concerned, it’s a good investment. It a rock-solid machine that’s loaded with good basic specs and functionalities.
Since its introduction, DeWalt DW745 has gained a lot of following in the market--largely due to its 15 amp motor, the 20-inch rip ability, and the 10-inch blade. It’s definitely a good-value equipment that’s best in the hands of beginners and moderate users. And if you are working within a tight budget, this will arguably get you the best equipment for your money. It has everything you’ll ever need to tackle a decent DIY project and more. In fact, even some professionals are inclined to use DeWalt DW745 on the job site due to its accuracy, durability, and portability.
]]>Oscillating multi-tools, shorthand: OMT, are pretty much the Swiss Army Knife of power tools. Since their introduction to the power tool market, OMT have become an essential for construction professionals, occasional trade workers, and even home improvement hobbyists.
Oscillating multi-tools are the ultimate jacks of all trades when it comes to tackling multiple construction applications. From scraping, grinding, sawing, sanding or remove silicone sealant, you name it, and chances are that oscillating multi-tools can do it. It is because of this very reason that OMTs make great addition to your workshop collection. Once you get to experience the many advantages that oscillating multi-tools bring to the table, then we can all but guarantee that you will find it a chore to go back to your old ways of doing things.
In the same breath that we mention oscillating tools, the ever so iconic power tools brand DeWalt comes to mind. The DeWalt DWE315K Oscillating multi-tool is one of the company’s most popular offering to the power tools market. So is only right that in this review, we will be taking a closer look at the DeWalt DWE315K.
Spec Overview
The DeWalt DWE315K is very similar to other OMT models in the market in terms of the way it look--sharing the familiar bullet shape and approximately the same dimensions with most of its competition; The DeWalt DWE315K is a roughly 13″ long OMT unit that weighs in at about 3.1lbs. But what makes the DeWalt DWE315K stand out from the rest?
When first inspecting the tool, the first thing that strikes you is the distinctive black and yellow colorway that is worn by DeWalt power tools across their product line. At the very heart of this corded oscillated unit is a 3.0 amp motor that delivers 0-22,000 oscillations per minute at a 1.6 degree angle. This makes the DeWalt DWE315 powerful enough to through almost any material and take on anything you throw at it.
Outside of raw power and performance, among the biggest selling of the DeWalt DWE315K is the company’s proprietary Dual Grip Variable Speed Trigger that adds a whole new level of control not seen before in any OMT unit in the market. DeWalt DWE315K’s variable speed paddle trigger allows for a straightforward and intuitive one-handed operation. All that is required of the user to engage the blade attachment is to apply pressure to either end of this long offset trigger will activate any attached blade--more pressure will increase the speed, less pressure will decrease the cut, and zero pressure will disengage the motor altogether. Note that the DWE315K’s variable speed trigger can only be applied at full speed.
The DeWalt DWE315K also features the company's proprietary Quick Change accessory system that allows users to swap the attachments at the drop of a hat without fumbling for a hex key-- accessories without going through the familiar hassle. You just squeeze down on the silver lever and you are able to disengage the clamp and free the blade attachment. While the Quick Change of mechanism pretty sleek, you might need to wait for the previous blade attachment to cool down a little before it’s safe to touch.
The DWE315K’s Quick Change system is compatible not only with all DeWalt attachment across their OMT line but also with OMT attachments of Porter-Cable and Black & Decker OMTs--as these brands are practically the same group of companies and therefore share the same type of quick change technology. Additionally, with the help of an adapter, the DWE315K can adapt a universal fit system that allows you to use accessories of other OMT makes and models. This makes the DWE315K one of a kind when it comes to sheer adaptability.
The DeWalt DWE315K excels in ergonomics. Weight plays a crucial part in ergonomics, and DWE315K comes in at 3.21 pounds--light enough that it doesn’t cause any strain on the users arms and back but not too light that the unit feels like it’s loaded with cheap internals.
Like most DeWalt products the DWE315K utilizes a smaller diameter handle--allowing its user to really wrap their hands around this nifty device. There is no doubt that the DeWalt DWE315K packs a lot of power and yet it’s able to deliver maximum power smoothly and without losing control thanks to its better grip control design and plenty of rubber over-molds.
Out of the box, the DeWalt DWE315K comes with the necessary attachments to get you started--wood and nails blade, fast-cut wood blade, semi-circle blade, sanding pad, 25 sheets of sandpaper and the universal fit accessory adapter. The DeWalt DWE315K also comes with good quality contractor bag, accessory storage box, and a particularly informative user manual.
The DeWalt DWE315K will set you back $159.00. Sure, there are dirt cheap models in what is turning out to be a saturated OMT market, but just like everything in this life, you often get what you pay for. The DeWalt DWE315K gets you an OMT unit with a lot of power and performance on tap, top of the line ergonomics, a level of versatility and adaptability that is difficult to match. $159 is a bargain.
The DeWalt DWE315K is a solid investment for any construction professional or occasional home improvement enthusiast. Considering that the original design was first introduced, and that DeWalt doesn’t find the need to replace it with a different model speaks to the quality of the DeWalt DWE315K. With company’s badge of reliability, proper design, top-quality components, and solid construction, expect the DWE315K handle the kind of use and abuse often expected and experienced in the workshop and in the workshop.
]]>
Whether you are a hobbyist, someone that loves doing home improvement projects, or someone that’s always working the shop, at some point, you will need to dispose of your blades. If you’ve been working for any length of time, you know that even though blades were built to last, eventually wear and tear breaks them down.
Once that happens, it’s time to determine how you are going to get rid of your old blades and bring the new ones in. We always recommend recycling your blades, and of course, purchasing your new ones at Ryker Hardware. Today, we’re going to walk you through how to recycle your blades safely.
Metal is a non-renewable natural resource, meaning it’s limited and once it’s gone, it’s gone. While metal is abundant, there is no reason to waste what could be reused. Also, it takes less energy to make recycled metal that it does to make new metal from ore.
No Curbside Recycling
If you have a curbside recycling program, then you should be sure to check first before just dumping your blades in the recycling bin. Most recycling programs do not accept scrap metal, and if caught, you could be fined or even stopped from using the program altogether. As a result of this, recycling them will need to be done elsewhere.
Local Recycling Company
If you have a local recycling company, chances are that they have a bin that you can toss scrap metal into. Depending on the type of company, you might need to know what metal your blade is made of. Steel is one of the easiest to recycle and can be quite valuable.
As such, it’s often in the company or county’s best interest to collect as much as they can. If your blades are not steel, you should ask the employees if they take that version of metal. Also, you should also ask before you put any blade into their binds. Though they might say steel scrap, you need to be sure that you won’t hurt a worker that reaches into the bin. Even a dull blade could seriously hurt an employee that didn’t know.
The other option is to take your blades to the scrap metal dealers. In the end, this is where they will end up so you should expedite the process if it’s closer to you than the recycling facility. As with the previous option, make sure to ask the company how you should present your blades when you take them in.
Recycling your blades doesn’t have to be a hard process. Throwing them away or into the recycling bin could not only hurt someone but get you fined as well. The best way to ensure that you are taking care to recycle your blades is to take them to the local recycling business or any scrap metal dealer in your town. Be sure to call ahead to make sure that you are following all procedures to keep from hurting anyone.
]]>What are Oscillating Tools?
Oscillating tools are the workshop equivalent to a Swiss Army Knife or an octopus - a multi-functioning piece of kit that can perform numerous functions. Also known as a multi-tool, oscillating tools have a vast range of attachments available, with specific tools for cutting, grinding, polishing, rasping, sawing, scraping and sawing. If you’re looking for sharp, detailed results, then an oscillating tool is your new best friend.
Who should use an Oscillating Tool?
It would be rare to find any tradesperson, be they a builder carpenter, contractor, flooring installer, joiner or plumber, without an oscillating tool as part of their kit. If you want to achieve high-quality results and you’re looking to upgrade your workshop or tool stash, take a tip from the pros and consider welcoming an oscillating tool to the family.
Oscillating Tool vs Reciprocating Saws
What can I use an Oscillating Tool for?
Fit the relevant accessory and you can:
Our range of Oscillating Blades
Diamond Oscillating Saw Blades
2.5” x 1.5”
From $9.95
Diamonds are a saw’s best friend - creating a durable and dependable blade tip. Our Diamond Oscillating Saw Blades are best for cutting:
15 Piece Variety Pack of Oscillating Saw Blades
$34.97
Our 15 Piece Variety Pack of Quick Release Oscillating Saw Blades for wood and metal provides you with a wide selection of blades to help you to complete any task. This selection of HCS Standard Tooth, Japanese Tooth, Premium BiMetal Fine Tooth, and Semi-Circular/Halfmoon Standard 4" Wide Saw Blades will cut through:
10 Piece BiMetal Quick Release Variety Set of Oscillating Saw Blades
$33.99
Get yourself kitted out for a lengthy project with our durable 10 Piece BiMetal Quick Release Variety Set of Oscillating Saw Blades. This selection of BiMetal Japanese Tooth and Titanium Coated BiMetal Fine Tooth Saw Blades is ideal for cutting:
Extended Reach Wood/Plastic Oscillating Saw Blades
From $6.95
Our Extended Reach Wood/Plastic Oscillating Saw Blades provide you with that valuable extra length for more effective and consistent cuts.
Semi-Circular/Halfmoon Standard Tooth 4" Wide Saw Blade
From $6.95
If you’re after an excellent all-purpose blade, then our HCS Cutting BladeOur Semi-Circular/Halfmoon oscillating saw blades are for you. They’ll cut a perfectly straight line through:
3 Piece Oscillating Saw Blade Set
$9.95
Our three-piece Oscillating Saw Blade Set is ideal for precision cutting wood and metal, featuring a selection of blades to suit your project.
BiMetal Wood Saw Blade with Japanese Teeth
From $6.95
Our new BiMetal Wood Saw Blade is the perfect combination of bimetal blade durability with Japanese teeth, creating the highest quality wood blades for absolute precision and faster cuts.
BiMetal Oscillating Saw Blade for Wood and Metal - Fine Teeth - 1 3/4 Inch Blade
From $6.95
Our BiMetal Oscillating Saw Blade is ideal for cutting wood and metal. The fine teeth will ensure that the tiniest detail is taken care of.
If you need help in choosing the right blade for your project, just get in touch and we’ll be happy to help. Saw long for now!
]]>Do you have an oscillating tool, multi-tool, or OMT? If you’re clever, you might have noted that those are all the same thing. They are just three of the names for a tool that you see on most job sites today. An oscillating tool is a hand tool whose blade moves (or oscillates) from side to side in very short and fast motions.
In general, you should expect the blade to make around 20,000 oscillating per minute. This enables it to do many things from cutting, slicing, sanding and grinding to polishing and even scraping. With the right accessory, the options are limitless for what you can do. Today we’re going to talk about a few ways to ensure that you are getting the most from your tool.
Whether you need to make plunge cuts or cut space under a doorjamb, the multi-tool is perfect for the job. Often when installing new flooring, the door jamb is in the way. If you use a scrap piece of the new flooring, then you will be able to use your oscillating tool to get the cut right where you need it.
When looking at plunge cuts, think about using the multi-tool when you need to create a hole in the wall for a new outlet, replace old wood on a deck, or even add a heat register. You’ll be able to cut the whole just where you need it at the perfect size — no more bringing out a Skilsaw and chisel to replace your old wood.
In tight spaces, you will also see this tool’s cutting abilities take the lead. Think about butting plumbing pipe inside a cabinet. No longer will you have to fiddle and find workarounds. Now you can do exactly what you want when you want to!
Finally, as a final way to get the most out of your multi-tools cutting skills, try using it on the job site to cut rigid insulation. Many people use electric turkey cutting knives to do this, but that belongs in the kitchen! The multi-tool can be used in every part of the job site and won’t have to be cleaned before next Thanksgiving.
Gone are the days of elbow grease for removing the old floorboard, residual adhesive, aged caulking, grout, or mortar. By using a grinding pad or and scraper blade you will be able to tackle the room remodels with ease. This is the perfect time for us to throw in the old saying, “work smarter not harder.”
With a sanding attachment, you can work with either wood or metal to create the perfect final product. If you’re looking for something that can ensure you have a high level of detail, an oscillating tool is perfect. It’s small and triangular sander means that you can get right into the crook of things to achieve the best detail possible.
Sanding is another reason this tool is a remodeler's dream. It’s the perfect way to remove a coat or refinish a surface without ever having to take it out of the site. That makes it perfect for old staircases or other structural features.
]]>
How many times have you gotten started on working on a home improvement only to realize that that you don’t have the necessary tools for the job? This Genesis GMT15A multi tool is designed so you never have to find yourself in this situation ever again. The Genesis GMT15A is essentially four different tools packaged in one easy to handle piece of equipment.
When you are shopping for your workshop and come across a fully-functional oscillating multi-tool with a price tag of around $40, it’s only natural to second-guess just how capable of a power tool it is. But don’t let the low price-point mislead you, the Genesis GMT15A, in fact, is a proper oscillating multi-tool that sports robust functionality for any number of home improvement applications--including fine sanding, old paint scraping, vinyl flooring, cabinet trimming, close-quarter sawing, and grout and caulk removal, among a host of other applications.
Spec Overview
At the heart of the Genesis GMT15A is a 1.5 amp electric motor that generates up to 21,000 oscillations per minute--more than enough performance to handle any basic grinding, sanding, cutting, and scraping application. The Genesis GMT15A multi-purpose oscillating tool is capable of doing quality work due to its outstanding oscillating power.
This Genesis GMT15A sports a four-pin flange that is specifically engineered to ensure that all attachments are securely installed in place. The Genesis team behind the GMT15A has gone the extra mile to ensure the user’s safety while operating the device.
While there are more durable OMTs in the market, the Genesis GMT15A is no slouch when it comes to build quality--with a substantial gear housing that's fashioned from die-cast aluminum. The die-cast aluminum housing is to prevent the inside components of the GMT15A from overheating. Thus it enhances the service life of the tool and also ensures security while working. The die-cast aluminum housing also does a fantastic job at keeping the total weight of the Genesis GMT15A relatively light at less than 4 pounds--a proper enough weight to allow for extended use.
The Genesis GMT15A offers incredible value for not much money. Right out of the box, the GMT15A comes with a 3” Delta sanding pad, sandpaper of varying grits, a scraping blade, a 30mm E-cut saw blade, an HSS segment saw blade, a hex key, and a custom accessory storage box. There is also a full range of Genesis accessories for the GMT15A. Alternatively, users can use the included adaptor to make accessories of other makes and models compatible to the Genesis GMT15A.
Unlike the more traditional power saws, the Genesis GMT15A sports a 30-millimeter flush cutting saw blade that allows for high-quality precision cutting along edges and in tight corners.
To fashion cut-outs from wood, plastic, or drywall material, the high quality the 3-inch flat saw blade included in the GMT15A makes for the perfect attachment. The rigid scraper blade makes easy work of pulling up stubborn vinyl flooring or carpeting. The scraper also works great at chipping away at old paint layers.
The Genesis GMT15A also makes for a proper detail sander. Just install the hook-and-loop sanding pad and sandpaper and you’re well on your way to dry sanding wood, plastic, or metal surfaces in no time.
The Genesis GMT15A comes with a limited 2-year warranty, along with complimentary customer service access and technical support within its warranty period.
Recommendation
It is no secret that the Genesis GMT15A faces stiff competition from other high-end oscillating tools. But if you are looking for a fully functional, entry-level oscillating multi-tool that comes with a dirt-cheap price tag, then the GMT15A might be the best option for you. It’s hard to beat GMT15A when it comes to getting a basic OMT that gets the job done while spending the least amount of your money. Thanks to its solid overall design, the Genesis GMT15A can properly take on a long list of home-improvement projects that once required a workshop full of expensive specialty tools.
]]>
What is an Oscillating Multi-Tool?
Despite being a core equipment in every craftsman's tool box, the oscillating multi-tool has not been around for very long. The oscillating multi-tool, or OMT, in fact, has been in the market only in last 10 years.
Today, the oscillating multi-tool is every home improvement specialist's quintessential do-it-all device. Thanks the many attachments and accessories that it accommodates, the oscillating multi-tool can practically do it all--plunge through wood, drill holes through the wall, cut through pipes, shear moldings, grind out ground, remove old paint, and sand off rough surfaces, among other applications.
The cutting motion of the multi-tool is distinctly different from that of traditional types of power saws. While traditional power saws follow either a back-and-forth or circular cutting path, the oscillating multi-tool--as suggested by its name--moves by way of high-speed side-to-side oscillations; a standard multi-tool typically cuts through things at 20,000 oscillations per minute.
Why Use an Oscillating Multi-Tool?
The unparalleled popularity of the oscillating multi-tool is largely credited to its versatility in performing a wide range of home improvement applications. Compared to more traditional power saw variants, the oscillating multi-tool doesn’t kick-back or grab when cutting through materials. And because of its small frame and often offset design, the oscillating tool is ideal for making very precise cutting even in relatively tight spots that are notoriously difficult for traditional power saws to even fit into
An essential part of everybody’s toolbox, an oscillating tool can be used in multiple home improvement and professional applications. With the proper attachments and accessories, the oscillating multi-tool can easily cut through, polish, and grind different materials such as wood, metal, drywall, mortar, fiberglass, and plastic.
Who Needs Oscillating Multi-Tools?
Perhaps a better phrasing of the question would be, “Who doesn’t need an oscillating tool?” The oscillating multi-tool is a constant companion of professionals and hobbyists alike, from home improvement enthusiasts to professional carpenters, contractors, and cabinet installers.
Because the oscillating tool accomplishes most of its technical applications--cutting, shearing, grinding, etc. -- by vibrating its blade over a narrow arc, it allows for better control and relatively lesser vibrations, both of which are ideal in performing common yet tricky tasks such as grinding tile adhesive, trimming baseboards and wood flooring, flush cutting door jambs, plunge cutting wood flooring, slicing nails and bolts, grinding out grout, among others.
What to Consider When Buying an Oscillating Multi-Tool?
As with any other purchase, price definitely is an important consideration when deciding on what OMT to buy. Your purchase decision, however, should not be driven by price alone. For this, it is best to shift your thinking from the isolated concept of “price” to the more holistic idea of getting the best value for your money.
It pays to invest a little time, effort, and attention--seriously, it doesn’t take much at all--into familiarizing yourself with various OMT options that are available to you. Once you have a good sense of what multi-tools get you the best value for your hard-earned cash, it is now time to look into individual reviews and comparisons.
Like in most purchases, it is in your best interest as a buyer to pay close attention to widely reported downsides. While it is normal, even expected, to see a random negative comment here and there--mostly from competing manufacturers and brand-loyalists--a consistent problem that’s commonly reported should warrant serious consideration.
Once you have created a shortlist of your top 3 or top 5 OMT choices, it’s time to double down and rate your choices in the following areas:
Speed
When it comes to OMTs, the quicker the oscillation, the better cuts. For effective cutting applications, you should look into a multi-tool that is capable of generating at least 20,000 oscillations per minute.
Faster is better in most cases, but not in all cases. If you are doing a lot of precision work, for instance, you might want to look into a variable speed oscillating tool that allows you to make the necessary adjustments to both speed and accuracy.
Power
Power and speed goes hand in hand with OMTs. But while power remains an important variable, it doesn’t occupy the same fundamental level of importance as raw speed.
When used in most normal applications, for instance, there’s not a whole lot of difference between a 2 amp motor OMT and a 3 amp motor OMT. That said, it doesn’t hurt to get a multi-tool that packs an extra punch for when you’re working with extra-demanding projects that could push your OMT to its very limit.
Ergonomics and Comfort
Any equipment--or practically anything for that matter--that you are going to use frequently and on a regular basis needs to be comfortable. A mark of a good OMT is that it’s ergonomically designed, well-balanced, and user-friendly.
Pro-tip: an OMT with a textured grip helps avoid hand blisters.
Noise and Vibration
With vibration comes noise. Powerful OMTs generate more vibration; as a result, powerful OMTs tend to generate a lot of noise.
Noise isn’t so much of an issue. You can always wear ear defenders to shut out most of the noise. And there are also more technologically advanced OMTs that successfully dampen noise down to a particular level.
Excessive vibration, on the other hand, remains to be a real issue as it can easily hurt your arms and hand, especially with constant and prolonged OMT use. Look into detailed reviews and make sure that the OMT that you are looking into can run without generating excessive vibrations.
Weight and Balance
Make sure that your OMT sits comfortably in your hands. It doesn’t necessarily have to be light as a feather. Light OMTs tend to allow for too much vibration. OMTs that are too heavy, on the other hand will cause your arms and hands to fatigue.
As with most things, the Goldilocks’ of OMTs is one that’s not too light and not too heavy at the same time. A mid-weight OMT that feels right in your hands will allow you to work all day long.
Price
To get the best bang out of your hard-earned buck, it is best to first set a budget for your OMT purchase.
When shopping, it is also equally important that you know the kind of work that you will using your OMT for. At the end of the day, your intended purpose will largely influence the budget that you set aside for your OMT purchase. It wouldn’t exactly be the smartest purchase decision if you end up buying an industrial-grade OMT for working on the occasional home improvement projects.
When it comes to multi-tools, you generally get better all-around performance, better build quality, and better engineering features--such as soft motor starts, universal fit system for you attachments, better vibration dampening-- as go up on the price ladder. This doesn’t mean, however, that you have to break the bank when shopping for your OMT purchase. You can very easily pick-up extremely capable OMTs without breaking the bank. As such, what follows is a list of the top 6 OMTs that gets you the best value for your money.
The cordless DeWalt DCS355D1 Max XR satisfies two important requirements of any good-quality oscillating multi-tool: portability and quick access. The DeWalt DCS355D1 sits comfortably in the hand--measuring 12 inches in length, and 3.22 pounds in weight, already including the 20 volt lithium ion battery.
It used to be with older model OMTs that you had to drag out a long, winding, and often tangled cord when working on even a simple home improvement project. Fast forward to a few years into the future, battery operated power tools have advanced to the point where cordless OMTs now offer the user the perfect brand of convenience, durability, and versatility.
The DeWalt DCS355D1 makes for a great investment if you’re looking for a technologically advanced OMT that will last for a long time. This is mostly because the DeWalt DCS355D1 is powered by a brushless motor that keeps the wear on gears to the bare minimum. The brushless design of the motor also does a commendable job in terms of reducing friction, improving efficiency, increasing run time by up to 57%.
Another handy feature of DeWalt DCS355D1 is the extremely bright super led light that comes on when pressure is applied to the trigger mechanism.
The DeWalt DCS535D1 comes with a number of accessories and attachments out of the box. It is packaged with some of the most commonly used cutting, sanding, and scraping attachments so that you can start using it right away. It also comes with universal accessory adaptor that allows to the user to equip OMT attachments from other brands. A good old wrench is all it takes to change out the accessories and attachments.
One of the more attractive features of the DeWalt DCS535D1 is its dual grip variable speed trigger that allows the user to manipulate the variable speed of the device from 0 OPM to 20,000 OPM simply by gripping the handle--the variable speed speeds up or slows down depending on the strength applied on the grip.
PROS |
CONS |
The DeWalt DCS535D1 is extremely reliable thanks to its brush motor design. |
It might be a little difficult for brand loyalists to find DeWalt blades at big box stores. |
The DeWalt DCS535D1 is equipped with a powerful battery that can last up to 24 hours. |
|
The DeWalt DCS535D1 comes with a plethora of tool accessories right out the box |
|
Next on our list is another cordless, battery operated OMT option from Makita--the Makita XMT03Z. To start with, the XMT03Z features a tool-less blade change system; instead of using the old hex key, the XMT03Z is designed with a latch and pin system that facilitates quick and easy blade changes. It is worth noting, however, that because of this update in the design of the XMT03Z, it is no longer be fitted with the LED light that came with the older Makita OMT models.
The Makita XMT03Z is unmistakably bigger and heavier when compared with other multi-tools in the segment. In fact the XMT03Z is even noticeably heavier than some corded models. Although the XMT03Z is bigger and heftier, it also has better build quality when compared to both older models and other OMTs in the market. The added weight does a fantastic job at dampening vibrations, and the larger gripping area makes for a more comfortable grip.
The XMT03Z delivers a good amount of speed and power for most applications--from slicing through nails, to plunge cutting through plywood, to notching old hardwood post. The power delivery of the XMT03Z is exceptionally smooth for a cordless multi-tool.
There are a number of well-considered safety features that are designed into the XMT03Z. For starters, upon turning the OMT on, the motor powers up with a soft start so it doesn’t cause any unnecessary jerking on the user’s arms. It also features a power on lockout mechanism so that the motor will not power on when re-inserting the battery when the power-switch is left in the on position. Lastly, this OMT is engineered with a vibration dampening mechanism that prevents excessive vibration from inflicting damage to the batteries.
While the runtime on the XMT03Z doesn’t last all day, it still gives the user an average runtime of 17 minutes with the motor maxed out, which is pretty decent when considering that the previous model had a motor-maxed out runtime of 15 minutes. It helps that the Makita XMT03Z comes with fast charging 18V batteries that requires only 30 mins of charging.
PROS |
CONS |
The Makita XMT03Z has solid build quality than both older Makita OMTs and other OMT competition. |
The Makita XMT03Z is bigger and heavier than other cordless OMTs. The XMT03Z is even heavier than some corded models.
|
The Makita XMT03Z is engineered with a vibration dampening mechanism that prevents excessive vibration from inflicting damage to the batteries. |
|
The Makita XMT03Z comes with fast charging 18V batteries that requires only 30 mins of charging.
|
|
The Fein Multimaster 350 QSL is part of the Fein family of oscillating multi-tools--together with both the Fein SuperCut Construction and the Fein SuperCut Automotive OMTs. Oscillating multi-tools aren’t particularly known for sporting featuring any unnecessary bells and whistles, and Fein understands this. With 40 years of engineering experience, Fein stuck with focusing on rock solid fundamentals when designing the Multimaster OMT--making sure that they check all of the boxes with a variable speed dial and a dedicated power switch instead of a trigger.
The Fein Multimaster 350 QSL is powered by a 350-watt Fein high-power motor that makes one of, if the not the most, powerful oscillating multi-tool in the market. Right from product inception, the Fein Multimaster was designed with the professional woodworker in mind. As such, Fein Multimaster keeps its weight well within four pounds--3.13 pounds to be exact--which makes it the ideal tool for extended use. Additionally, the lightweight standard housing design of the Multimaster plus the ergonomic small diameter handle does a great job at minimizing any unnecessary strain on the back or arms of its user.
When it comes to blade and accessory changes, the Multimaster comes with the Starlock Plus Blade Change System, which Fein and Bosch co-engineered, that lets the user eject and install OMT blades and accessories without so much as touching the items. This feature is especially useful when you are in need a blade change immediately after finishing a cut--with the previously installed blade heated up at 200 degrees. This changing mechanism also makes for a more secure connection as it features the Starlock’s 3D chuck system which is a specialized 3D impression that allows the blade to fully wrap around the chuck.
If there is one drawback to the current iteration of the Multimaster, it is that it lacks an integrated LED light mechanism which makes using it in dark environments quite cumbersome.
PROS |
CONS |
The Fein Multimaster 350 QSL is arguably the most powerful OMT in the market right now. |
The Fein Multimaster 350 QSL lacks a LED light mechanism for low light application. |
The Fein Multimaster 350 QSL is designed for extended professional use with its standard lightweight housing design and ergonomic small diameter handle. |
|
The Fein Multimaster 350 QSL features the Starlock Plus Blade Change System which makes for tool-free OMT accessory changes. |
|
Good OMT manufacturers have one thing in common in that they know what makes a solid build and functional design. So it doesn’t come as a surprise how the Milwaukee M12 looks stunningly similar to the Bosch Multi-X OMT. It’s not that both units are the same exact OMT because they decidedly are not; it’s more of a situation where both manufacturer’s, despite coming from different directions, arrive at a rather similar solution--or in this case, similar engineering execution.
Well balanced and comfortable in the hand, it is worth noting that the Milwaukee M12 is among the lighter OMTs that is out right now, weighing only at 2 pounds and 3 ounces. The M12 sports a rather simple design with sleek curves and an over molded rubber grip that covers most of the tool.
The Milwaukee M12 features a variable speed control, with each numbered setting clicking and locking perfectly into place; this feat prevents the user from making any unwanted or accidental adjustments. Variable speeds of the M12 ranges from 5000 OPM to 20,000 OPM. The M12 is powered by M12 Red Lithium batteries that has average runtime of 15 minutes.
Milwaukee designed a soft start mechanism to the M12. This allows the user to get a good feel for the tool before making the necessary adjustments. To further prolong the life of the M12, Milwaukee has set in place a motor overload protection that keeps the user from ruining the tool.
PROS |
CONS |
The Milwaukee M12 has overall solid build and functional design. |
The Milwaukee M12, while still a dependable OMT, M12 can be a little outdated when compared to the Milwaukee M18. |
The Milwaukee M12 is balanced and comfortable in the hand. Weighing only at 2 pounds and 3 ounces, the M12 is among the lighter OMTs in the market. |
|
The Milwaukee M12 features a variable speed control mechanism that prevents the user from making any unwanted or accidental adjustments. |
|
The M18 is Milwaukee’s updated version of their hugely popular M12 OMT that first came out in 2012. Compared to the older model, the M18 comes with a few upgrades. The M18 is equipped with a motor that delivers more power; it features a tool-free blade changing system; and it has a runtime that is twice longer than many OMTs in the segment.
Right out of the box, you can tell that Milwaukie put a lot of thought into engineering the M18. The tool, weighing at 4.15 pounds, balances itself quite nicely in the hand. Right out of the box, the It comes with all the essentials, including the M18 multi-tool of course, the compact M18 Red Lithium battery, a multi-voltage charger, an adapter, a sanding pad, and a wood cutting blade.
The M18 can deliver between 11,000 to 18,000 oscillations per minute. It features Milwaukee’s constant power technology that maintains cutting speed under load. The user can set their preferred speed via a variable speed dial that sits on the handle of the unit. The power delivery of the M18 is rather smooth. The tool does a fantastic job at dampening the vibrations.
Like many multi-tools, the M18 tends to get a little loud.
The M18 is designed with a solidly built, all-metal gear case, a built-in led light on the front, and tool-free blade change mechanism. The blade-changing set up of the M18 is rather convenient; just lift the lever that sits in front of the tool and twist out the bolt that retains the old blade in place, and swap out the new blade. The M18 uses a universal blade interface that is engineered to make use of most blades and attachments from other popular OMT brands.
Like most cordless oscillating multi-tools in this list, the Milwaukee M18 is does a great job for applications that prove to be difficult for cordless tools to access. That said, if you are a professional contractor who’s looking into getting a full day’s work out of your OMT, then you might still want to consider a corded variety.
PROS |
CONS |
The Milwaukee M18 is a significant upgrade to an already proven OMT in the M12. |
The Milwaukee M18, like most OMTs, tends to get a little loud. |
The Milwaukee M18 has a runtime that is twice longer than many OMTs in the segment. |
|
The Milwaukee M18 does a fantastic job at dampening the vibrations. |
|
The fact is that we can’t make a comprehensive enough list of the best oscillating multi-tools in the market without talking about Dremel. Dremel’s recent offering to the OMT market, the VC60-01 Velocity, is a corded oscillating tool engineered to bridge the gap between specialized, more powerful, rough cutting tools such as the circular and reciprocating saws and the more versatile OMTs. In terms of design, the Dremel Velocity looks like a cross between their Ultra Saw Circular Saw line and their Multi Max OMT line.
Dremel accomplishes this task head-on by equipping the Velocity with a beefier 7.0 amp motor that powers the OMT through tough jobs that more conventional multi-tools just can’t handle. In comparison, most conventional OMTs are only powered by a 3.4 amp motor that limits their utility when subjected to demanding cutting applications. Due to its significantly more robust motor, the Velocity can power its way through most materials--anything from sheet wood to dimensional lumber.
The Velocity features 2 distinct cutting speeds: precision speed and hyper-speed. With the hyper-speed setting, the Velocity generates a cutting speed that is 9x faster than most entry level OMTs. The Velocity also features an extra wide 5 degree oscillating angle that further allows for the delivery of faster and more aggressive cuts. The Dremel Velocity is specially engineered for rough cutting jobs that prove to be too difficult for most traditional OMTs. The Velocity delivers long and fast cuts that no traditional multi-tool can.
Because the Dremel Velocity is unapologetically big and hefty at 4.45 pounds, it is designed with a swing-out control mechanism to help improve cutting accuracy. The swing-out control foot rests the Velocity on the material being cut; this swing-out mechanism provides support to the Velocity in the same fashion that a shoe provides support to a jigsaw. This patented control mechanism becomes most useful when working with large cutouts and longer sheet materials. With the control foot open, the Velocity is optimally configured for making long-cuts in panel materials. With the control foot closed, the tool functions like most standard OMTs that are optimized for various cutting, sanding, grinding applications, among others.
It is also worth noting that the Dremel Velocity is also engineered with a quick tool-less accessory change set-up.
PROS |
CONS |
The Dremel Velocity is equipped with a beefier 7 amp motor that powers the OMT through tough jobs that more conventional multi-tools just can’t handle. |
The Dremel Velocity is unapologetically big and hefty at 4.45lbs. |
The Dremel Velocity generates a cutting speed that is 9x faster than most entry level OMTs. |
|
The Dremel Velocity bridges the gap between specialized, more powerful, rough cutting tools such as the circular and reciprocating saws and the more versatile OMTs. |
|
A welcome addition to Porter Cable’s line of 20-volt max high-performance power tools, the Porter PCC710B 20V Max is a cordless oscillating multitool that packs plenty of power to get through multiple OMT applications throughout the day.
The PCC710B features a variable speed dial (8K-18K OPM) that facilitates better control across a variety of precision tasks. The PCC710B also features a 2-finger tool-less, spring-loaded, changing mechanism that makes adjusting and changing accessories relatively quick and easy. Offering outstanding value for the money, this Porter OMT comes with an 11-piece boxed set of accessories that covers a wide range of cutting, sanding, scraping, and grinding applications. It also accommodates most universal OMT attachments,
The PCC710B is designed with an integrated LED light that allows for better visibility in low light work conditions. Part of the comfort feature of the PCC710B is the 3 position over molded grip that is specifically designed to reduce vibration and improve tool grip--although, users with particularly smaller hands may still find the tool to be a little too bulky to handle.
PROS |
CONS |
The Porter Cable PCC710B 20V Max offers outstanding value for the money out of the box--with with an 11-piece accessory set that covers a wide range of home improvement applications. |
The Porter Cable PCC710B 20V Max may be a little too bulky for users with smaller hands. |
The Porter Cable PCC710B 20V Max features a 2-finger, spring-loaded, mechanism that facilitates tool-less and hassle-free blade changing. |
|
Porter Cable PCC710B 20V Max accepts most universal OMT attachments. |
|
Oscillating multi-tools can often be purchased individually as “tool-only” or as part of an “OMT kit”. If the budget allows, you might want to consider purchasing an OMT kit as it gets you the complete package right out of the box. It is not uncommon for OMT kits to include as many as a dozen accessories and attachments--including various blades that are most commonly used in a broad range of OMT applications.
Whether you are a home-improvement hobbyist or a professional contractor, it always pays to make sure that the OMT kit that you are looking into purchasing includes most if not all of the attachments that are necessary in completing your work and projects. You might also want to look into specific product features that could make your work a little easier; product features like quick change accessory system, variable speed control, led light, and an extra-long cord, among others.
At the end of the day, if you’re looking for solid all around OMTs, we believe that the 6 options included in this discussion should make for a well-considered working shortlist.
]]>The versatility of Rockwell Sonicrafter F80 is perfect for any do-it-yourself dad because it works faster and harder compared to any multi-tool. This tool also allows the user to choose the oscillating angle that best fits the certain job.
The new Rockwell Sonicrafter F80 has improved the multi-tool performance by providing a choice of two oscillating angles - 5.0° and 3.4°. When a project requires fast and aggressive cuts, you can choose between the two angles for continuous control.
The Sonicrafter F80 can be used at a 5.0° oscillating angle to do short work of cross-cutting, ripping, or making plunge-cuts in wood and other materials. This angle is also perfect for trimming doorjambs, cutting PVC, and clipping nail heads or cutting metal plumbing pipes. With a rigid scraper blade, you can choose a 3.4°angle to remove blistered paint, take rust to bare metal, or scrape hardened adhesives.
When it comes to speed, the Sonicrafter F80 is five times faster than the basic Sonicrafter RK5121K. It also features the maximum cutting load capacity of 35 lbs. of force. With this range of power, this multi-tool can be pushed harder than any multi-tool without stalling the blade.
Here are the key features of Rockwell F80 Duotech Oscillation Sonicrafter
Placed within the Sonicrafter F80's compact build is a powerful 4.2-amp motor. This tool, with the cutting power of a 4.2-amp motor, delivers 10,000 to 19,000 oscillations per minute. With the electronic consistent speed control, it provides additional power to the blade as friction increases against it in order to maintain speed.
Increasing a multi-tool's oscillating angle can cause vibration. For better performance and accuracy, the Rockwell Sonicrafter F80 applies an internal counterweight to reduce vibration and ensure smooth, accurate cuts.
Rockwell’s Universal Fit™, the industry’s first true universal accessory system, increases the multi-tool's versatility as it accepts other major brands’ accessories without using adapters. Rockwell’s universal accessories also are designed to fit all other competitive oscillating tools. This allows users to use Rockwell accessories without sacrificing fit or performance.
The F80 multi-tool also features a spring-loaded centering mount using Rockwell's hyperlock technology to keep accessories positively and securely applied. The Hyperlock provides one ton of clamping force to prevent accessory slippage. So far this is the highest accessory clamping force applied on any tool-less oscillating tool.
The Sonicrafter F80 has 10 Universal Fit accessories, it includes three 1-3/8” end-cut blades (bimetal, precision, and standard), one 3-1/8” HSS semicircle saw blade, one flex scraper blade, one sanding pad and three sanding sheets, plus a hard case. The compact case features separate bulk storage areas for quick and easy access to the tool and accessories. Its rigid, durable construction provides ease of stacking and transport.
If you are looking for a multi-tool that makes difficult chores easier without having to spend a fortune, Rockwell Sonicrafter F80 should be on top of your list as this gives you more bang for the buck.
]]>We live and breathe home reno, and we know you do too. So we’ve listed some of our favorite podcasts that give great advice, unique hacks, and sometimes just a good laugh.
If you like to make stuff, fix stuff, or listen to interesting things while doing either of those things, these podcasts are for you.
1. The Money Pit Home Improvement
The Money Pit is America’s largest syndicated radio and podcast. Hosts Leslie Segrete and Tom Kraeutler focus their podcast on practical home improvement advice, with a particular focus on low-cost DIY hacks.
The show has a call-in format, meaning the majority of the podcast is about answering questions from the audience. This means that every airing is completely unique, and you can even call in yourself to get an answer to a burning question. The hosts are a font of knowledge, and no DIY question can seem to stump them! They also bring in guests for interviews, including the cast from the PBS series This Old House.
The Money Pit is a must for any home improvement amateur or professional. Kraeutler has been a home improvement expert and professional home inspector for over two decades, and Segrete is known for her gorgeous work with interior design, carpentry, sewing, and cooking. These two are a powerhouse for great tips—and they’re always good for a chuckle.
2. Fix It 101
You can find Fix It 101 on NPR (National Public Radio), and it’s one of a list of classic favorites for renovators. Whether you need to learn to fix a leaky shower head, mount a TV, build a chair, or install recessed lighting, Fix It 101 is there to teach you to install it, improve it, and fix it. The majority of the show is call-ins from listeners asking questions, and they sprinkle in a few guest hosts as well.
This is a great podcast to call in if you’re not sure you can fix it yourself or call in a professional. Don’t be afraid to call in yourself—no question is too big or small.
3. Stuff You Should Know
This podcast is about just about everything—aka all the “stuff you should know.” It covers tips and tricks related to home improvement, decoration, crafting, DIY, science, and more. It’ll even go over TV, movies, true crime, medicine, and neuroscience! Everything you want to know is here in an entertaining, unique format.
Stuff You Should Know is the podcast for the DIYer who likes to learn and be surprised. Although you won’t get home improvement every day, you’ll learn a lot about stuff you never knew—and it can give you the inspiration you need to tackle that next DIY project.
4. Home: On
If you’re looking to make your house more futuristic, then Home: On is the perfect podcast for you. Hosted by Richard Gunther, this show focuses on gizmos and gadgets for a “smart home.” They’ll review everything from home tech news to favorite products to weekend-long DIY projects. They often host awesome guests like Jamie Siminoff, CEO and founder of Ring, Mike Wolf, creator of Smart Kitchen Summit, and Molly Wood, senior tech correspondent for Marketplace.
Whether you’re implementing your first smart house accessory or you’ve become the techiest house in the hemisphere, Home: On always has something new to learn and implement to take your home to the next “smart” level.
5. Young House Love
The Young House Love blog was such a success that it has grown to a podcast, store, books, and products. We love this podcast because they make home improvement approachable. They do more than just hand you an instruction list for a DIY project. They’ll discuss everything from their décor regrets to the benefits of white brick to the how-tos of downsizing. Hosted by husband-wife pair John and Sherry Petersik, they offer over 3,000 DIY and home projects, and they do it in a fun, amusing way.
The Young House Love podcast is for those who love picking up new home improvement projects, whether they be as small as a vase or as large as a kitchen reno.
6. Reclaimed Audio
Reclaimed Audio is a unique podcast that focuses solely on updating and reusing your items. They teach you to take existing materials you have in your home and recycle or up-cycle them with a new purpose. The goal here is to reduce waste while cutting costs by providing you with new gadgets and repaired tools that you already have or can find for cheap (or free).
The Reclaimed Audio guys (Phil, Bill, and Tim) talk about everything from recycling your old guitars to improving your satellite connection to updating vintage electronics. If you want to save your wallet, update your home, and repurpose items you’d otherwise waste, then Reclaimed Audio is a must-listen.
7. Adventures In Design
Adventures in Design, hosted by Mark Brickley, is a daily show that focuses on creative, artistic projects in the home. Brickley will bring you through not just the project itself but everything that goes with it: process, time management, budgeting, and even what it’s like to be a small business owner in design.
This show will entertain you while inspiring you to delve further into your artistic juices. You’ll feel both creative and constructive with this “adventurous” podcast.
8. RepcoLite Home Improvement Show
RepcoLite Home Improvement Show is sponsored by Benjamin Moore Paints, but it doesn’t feel commercialized. You can tune in Saturday morning to learn about everything from unclogging a toilet to installing decorative columns to debugging your car. If it’s fixable or updatable, they’ll review it on RepcoLite.
This is our favorite “little-known” DIY show because each show has a highly specific topic but they still cover a range of relevant features within that area. This one is definitely worth a listen, especially since they have all of their episodes available on their website.
9. Lifehacker
Although this isn’t focused solely on home improvement, “The Upgrade” podcast by Lifehacker will give you all the necessary hacks to improve your life. From home renovation ideas to health tips, you’ll get easy-to-use tools that you can implement in your daily life. The goal is to upgrade your life using a “how to format.” It can even help you find a date if you can ever pry yourself away from your DIY work.
They’re an especially interactive show. They’ll answer your questions, and they might even share your own life hacks that you send in.
Conclusion
The best way to improve your skills is constant practice. And if you can’t constantly be at your woodworking bench or crafts table, listening to tips and tricks of your craft is the next best thing!
What home renovation podcasts do you listen to?
Do any of our readers out there have their own restoration podcasts? Let us know in the comments below!
]]>What do you need to know about prefabricated homes and buildings and this cost-saving wave of the construction future?
What are prefabricated buildings?
Prefabrications, or off-site fabrications, are buildings that are fabricated before(“pre”) coming to the construction site. These are also often referred to as “modular” buildings because the buildings come in different pieces or modules.
Basically, the different pieces of the structure are built in a factory. They are then transported to the construction site, where the different pieces are assembled together into the final building.
Prefabricated buildings are not mobile homes. They need a foundation just like any other construction site. The foundation is typically built on-site, and the other pieces (like the walls, roof, floors, windows, and doors) are initially created in the factory and then assembled on-site.
Prefabrications have had a reputation of being cheap and low quality—because they were initially used to create short-term housing, especially for those needing assistance and relief from emergencies. But this reputation is outdated and misconceived at this point. Today’s prefabrications are elegant and high quality, and they’re often indistinguishable from traditionally-built homes.
Plus, they’re some of the highest tech construction you can get. A lot of prefabricated building parts are printed with 3D printers. Learn more about the emerging 3D printing technology here.
What are the benefits of prefabrications?
When the construction crew shows up, most of the parts are already made. The workers just need to assemble the parts, hook up the utilities, and do safety checks. This means significantly less manpower and time on site, leading to drastically faster construction times.
Additionally, because most of the construction is done indoors in a factory, the construction process is less vulnerable to weather delays. You could build all of the pieces in the middle of a week-long run storm, and you only need one sunny day to put all the walls together on-site.
Imagine a six-month project taking two weeks. That’s what you get with prefabricated structures.
Building high-quality structure pieces off-site helps to create a “tighter” construction. When the pieces are put together, they tend to have a closer seal at the seams, which can help better regulate energy usage when the building is in use. Prefabrications are also highly modern, so most companies use state-of-the-art windows and utilities to that help make the building more efficient.
This minimized carbon footprint is great for the environment, for the building owner’s wallet, and for the “green” mission of the construction company.
Additionally, construction in the factory allows for optimal use of materials. Companies are able to track the materials being used, and they can recycle with greater ease.
The average cost to build a custom home ranges from $350,000 to $1.5 million. Prefabricated homes average between $50,000 to $300,000. That’s a significant cost difference.
Fast construction times means lower labor costs. Labor is the greatest construction expense, so lowering this can have major impacts on overall costs. Plus, the increased energy efficiency means long-term savings on energy bills.
Because the parts are assembled in a factory, there tend to be more quality assurance processes in place. There are supervisors constantly watching the production and there are strict, uniform processes to follow. High-precision, high-technology factory tools further ensure consistent output of building parts. Plus, factory construction means that the building is less susceptible to the elements (like weather, animals, and thieves) during construction.
There also tends to be a higher quality because those workers on-site are all highly skilled. Prefabrication construction companies don’t need to hire as many laborers, so they tend to hire only those who are super skilled in their areas. As opposed to hiring ten bricklayers, the company hires one brick supervisor.
Greater quality assurance helps construct safer, stronger buildings. The “tight” construction of prefabricated buildings also means that the structure might be sturdier—which may even help withstand certain natural disasters like earthquakes and tornadoes.
Moreover, laborers spend less time on the job site, and they tend to be doing less labor-intensive tasks. Most of the on-site construction involves technology like cranes and bulldozers as opposed to manual hands-on labor. This helps improve the safety of construction workers, which tend to have a high rate of injury.
Prefabricated buildings come in “pieces” so you can customize your structure to your specifications. Customization options are nearly endless because parts can be designed and built in a controlled environment. 3D printing also makes these customization options even stronger.
What are the disadvantages of prefabrications?
You usually need a greater down payment for prefabrications compared to traditional buildings. The down payment is usually around 20%, and the rest you pay off in your mortgage. You may also need to apply for a specific prefab-home loan from your bank.
The upside to paying more upfront means you save money in the interest in the long run.
Hooking up utilities to your prefab home takes a lot more organization because you need to compare foundation and off-site blueprints. The best way to overcome this concern is to work with a prefab construction company that offers utility services, so you don’t have to worry about it yourself.
You usually need to apply for (and be approved for) a permit that is specific to a prefabricated or modular building. These can be hard to obtain in certain cities. They’re more common in energy-conscious cities without lots of building laws.
Prefabricated structures aren’t “cheap” like their misconceived reputation suggests. In fact, they are equal in cost to traditional housing. Labor costs are lower, but transport costs can be high.
Prefabricated buildings require advanced technology. They need heavy-duty cranes and precision machinery to make sure the pieces are appropriately fixed together. This means that companies need to constantly stay updated with solid technology advancements.
On the plus side, this means that prefabrication is always at the forefront of technology and advancements. To stay competitive, construction companies constantly have to be innovating—which leads to massive growth for the building industry overall.
How are prefabrications being used?
Currently, prefabrications are most popular for small to medium homes and office buildings. This is because factories are able to create walls, roofs, and floors with ease—but more complicated structures are still too large for the assembly line.
Prefabrications are also increasingly common for concrete and steel structures. It’s much easier to mix and mold concrete in a factory than transporting wet concrete and attempting to mix on-site. And the cost of cutting and welding steel is much lower with standstill factory technology than transporting tools to the job site.
We anticipate that companies will start to create methods to expand prefabrications to even larger building projects, though. In fact, some companies have already started to undertake major public projects using 3D printing prefabrication, like MX3d’s creation of the stainless steel bridge in Amsterdam.
Conclusion
Prefabrications are able to raise safety and quality while lowering costs, construction time, and energy consumption. Prefabricated buildings are modern and elegant with a high value that is only going to increase over time.
Want to stay up to date with the construction industry’s fast-paced advancements?
Subscribe to the Ryker blog now to get news and info right to your inbox!
]]>What do you do if a tool isn’t working effectively anymore? How do you know when it’s time to repair or replace your tools?
Using functioning tools is the key to any successful project. A dull or rusty blade can instantly botch a piece of wood. Dying battery-powered tools can be a safety hazard. Worn out sanding belts can start throwing wood chips around.
You want fresh, functioning tools for optimal performance.
So when should you update your toolbox? And how do you know if you need to repair or replace any of your tools?
When it’s time to repair or replace
How do you know if your tools are wearing out and need repair or replacement?
1. If you see anything visibly wrong with your tools, it’s time to repair or replace. This could be anything from faulty wires to rusted blades to broken teeth to shattered handles. Never use a tool if it’s showing significant signs of wear, as it can be a safety hazard and it can damage the project at hand.
2. You may not always see visible signs, but you might notice a decline in performance. If it’s taking longer to complete jobs or projects aren’t turning out as successful, you might want to see if faulty tools are to blame. Lowered efficiency is often a sign of a broken tool.
3. You should implement a tracking system for your tools. When your tools reach a certain number of usage hours, you’ll take them in for a check-up and tune-up. This can help you catch problems before they become serious problems, so you can make small repairs as opposed to large replacements.
4. It’s time to replace if your tools are outdated by at least five years. This doesn’t mean they’re five years old necessarily, but it means that newer and more advanced models have been out for at least five years. You want the most advanced tools your budget allows for, as this improves the efficiency of your labor and the value of the project.
Train your employees to keep an eye on the tools they’re using every day. Then, give them a method to formally report any deficiencies with their tools. This helps protect from safety concerns, legal issues, and financial losses.
Repair or replace
How do you know if you should repair or replace broken tools?
In most instances, you can follow the repair “50% rule.” If the repair cost is more than 50% of the replacement costs, it’s not worth it to repair. As a basic example, if a replacement saw blade costs $100, you shouldn’t repair your old saw blade if the repair would be more than $50.
This is a general rule of thumb, but there are other factors to consider as well. The 50% rule looks at the replacement cost of an identical machine—not how much you originally paid for it. With depreciation and usage costs, there might be different valuations on your machine.
It also doesn’t consider the current value of your tool. Even if the tool is broken, it still retains some sort of value. Disposing of it instantly removes that value while repairing it adds value back to the tool.
So, you want to consider how much value you would get from a new tool compared to the value you’d be throwing out. If your tool only has a few small repairs, the life left in it might be worth the cost to replace. But if there are new tools out there with better technological advancements, the value of your old tool might not be worth it even if the repair costs are low.
Contact Ryker Hardware if you want a free consultation about your reparation and replacement costs.
How to repair
Typical tool problems that can easily be repaired include:
Here are some of our Ryker tips and tricks for repairing and extending the life of your saw blades:
Your saw blade track needs to be properly aligned in order for your tool to perform. If the wheels aren’t in alignment, it can damage the blades and belt. This kind of damage can be hard to repair or fix, so you may have to replace it. You may need to realign your blades every few weeks or months, depending on usage.
Metal chips on your workspace can ruin and dull your saw blade. Keep your workspace clean, so stray chips don’t run through the kerf during the cut. This keeps the “kiss” between the material and the blade clean without anything in the way. The cleaner your workspace, the better your tools can perform.
Keep your fluids fresh and at the right level, which helps make sure your saw blade has enough “juice” to work. Change your gearbox and hydraulic oils regularly for a smooth cut, so it won’t overheat or wear out the power tool.
Every time one of your workers puts away a tool, have them fill out a quick form about the tool. This makes sure they’re looking for any potential damages or broken parts before and after using the tool. This can help you catch problems while they’re still fixable.
Catch problems early, and you’ll save a lot of money in the long run!
How to discard
How do you safely and appropriately discard old saw blades and tools?
Saw blades are typically made out of steel with durable carbide tips. Steel can be recycled, again and again, so you don’t have to waste it. But you don’t want to just throw your saw blades in the recycling bin, because they can cause a serious safety hazard for municipal workers.
Instead, bring your old saw blades to scrap metal dealers. They’ll usually pay you a small price for your blades, so you can have another stream of income for your business that can go towards buying new tools.
You can also try to donate your old saw blades. You can even contact local schools with shop classes to see if they could use some donated blades. Some organizations, like Habitat for Humanity, will also accept donations of used saw blades. You might even be able to take these donations as a tax deduction.
The handle of your saw usually can’t be recycled, though. Treated wood or plastic isn’t recyclable, so you’d typically have to throw it out. However, if the handle is made of untreated wood, you might be able to recycle it at a local center.
Conclusion
Be aware of the lifespan of your tools, so you’re not using worn out or unsafe products. Train your employees to spot and report potential damage, so you and your managers can effectively handle it. If there’s value left in the tool, repair it as necessary. If not, recycle it at an appropriate dispensary.
If you’re not sure the lifespan of your tools, or you want a “toolbox consultation,” contact Ryker Hardware now.
We’ll be happy to give you advice on repairing or replacing your tools to make sure your projects are always effective, efficient, and top-notch.
Contact us now for a free consult.
]]>
There’s a good reason for this green shift. In fact, the building industry consumes nearly half (47.6%) of all energy produced in the United States. 75% of all electricity is used to operate buildings. This is causing a major financial and environmental expense that’s draining businesses, especially retailers.
The construction industry is historically one of the least green sectors. That’s why a growing number of clients are becoming increasingly concerned with how they build. In response, more construction companies are going green as a means of differentiation from competitors.
To appeal to the ever-growing green market, your construction company needs to implement more eco-friendly, green practices.
Thankfully, going green isn’t as challenging or expensive as it once was. Thanks to technological developments in construction, it’s becoming easier than ever to make your construction projects more eco-friendly.
So what can you do to effectively be more environmental and expand your green offerings to clients?
1. Get your green certification.
Being “green certified” can show that your company cares about your local and global community. This tells your clients and stakeholders that being green—and all of the benefits that come with it— is an important part of your mission and offerings.
You can be green certified and/or use materials that are green certified. There are a number of ways to get your company or project certified as “green,” but the two most significant are through LEED and GBI.
The U.S. Green Building Council is the primary rating system for eco-construction in America. In 2000, they released the Leadership in Energy and Environmental Design (LEED) criteria, which is a rating system for standing and in-construction building eco-performance.
The Green Building Initiative (GBI) assists the National Association of Homebuilders (NAHB) to promote more sustainable building guidelines for residential structures specifically.
Both organizations use performance-based codes to ensure that your design, construction, tools, and processes are up to state and local green codes. The International Green Construction Code (IgCC) often sets these comprehensive requirements as well.
Common certifications for building materials and appliances include:
Learn more about the ins and outs of green certification here.
2. Use green materials.
There are a number of sustainable materials that are actually more cost-effective and efficient than traditional construction materials. The resources you use will determine the cost, longevity, and health of the overall structure—which is important to your clients.
Some of the best green materials to consider using in your construction projects include:
It’s also important to use carpeting, painting, and coatings that are made without volatile organic compound (VOC) emissions.
Check out some of these interesting uses of green materials with Inhabit.
3. Install green solutions.
Some clients may actually want you to install additional features that make the building greener. Offering eco-friendly options is a great way to differentiate your business and delight your client.
For example, insulation is one of the best (and cheapest) ways to reduce a building’s energy bill and environmental footprint. Heating and cooling account for nearly 50% of a building’s energy consumption. Insulation works to trap heat to better regulate temperature throughout the building. Insulation in walls, roofing, doors, and windows can help seal in building temperature so HVAC air doesn’t escape outside the building, wasting energy and expense.
Solar panels are also becoming an increasingly popular green solution. Solar energy is a clean, renewable source of power that’s proving its worth despite the initial upfront price tag. Check out some interesting facts about the growth of solar power here.
Other examples of popular building solutions include:
4. Use green building resources.
There are two tools you can use to guide you in your quest for green. The HDPs and EDPs can help you make strong eco-friendly choices by presenting manufacturer reports on the materials and ingredients in their products.
The Health Product Declarations (HPDs) focus on the health effects of products. If your client is concerned about how the materials you’re using will impact the health and wellness of their inhabitants, especially with regards to air quality, the HDPs are a great resource.
The Environmental Product Declarations (EDPs) look at a product’s total environmental impact from beginning to end on the supply chain. Similarly, manufacturers are also conducting Life Cycle Assessments (LCAs) of their products. This measures the total environmental impact of products from harvesting of resources to energy usage to final waste.
5. Offer off-site construction.
Prefabricated or volumetric construction is when mainframe structures are mass-produced and delivered directly to the site already constructed. This saves time, transport, and waste. It allows for greater control in manufacturing and better quality builds without worrying about the elements on site. It also wastes significantly less energy, fuel, and natural resources.
This is similar to permanent modular construction, which involves creating specific sections or modules of the building off-site and then assembling them after delivery.
Learn more about off-site construction here.
6. Implement new technologies.
There are countless new advancements in construction technology that are making your building processes more efficient and streamlined. Going paperless does more than just save the trees; it actually allows you to run a more energy- and material-resourceful business.
3D printing is one of the hottest construction technologies that’s making an eco-splash. 3D printing not only reduces construction time to a fraction, but it also prints in fully recycled materials—and these materials are themselves re-recyclable. Learn more about the significant green benefits of 3D printing here.
Blockchain technology is also becoming more and more common in the construction industry. Each company, partner, and client involved in the build can input and centralize their data with blockchain tech. Learn more about the impact of blockchain technology on the construction industry here.
There are also a number of construction softwares that help with holistic project management. These can assist you with everything from material procurement analysis to accounting and human resources. AI-based technology is especially useful because it can analyze your current numbers and offer green solutions that can save time, money, and resources.
For example, estimation software helps you build a better projection of the project. This will calculate the exact amount of materials and labor you’ll need for the build, which helps prevent unnecessary waste and cost.
7. Choose green partners.
The partners and sub-trades you work with will make or break your green mission.
For example, you want to offer steel as a renewable resource. You convince your clients to use steel frames and roofing because of its efficiency, long-term cost benefits, and lower environmental impact.
But you find out that your supplier of steel is using double the amount of energy during production that other companies are using. This is actually worsening the environmental impact and making the steel less efficient—even though steel is naturally one of the greenest materials.
This can severely damage your reputation as an eco-friendly company because you are sourcing from a non-green partner.
If you want to get the benefits of being an eco-friendly company, make sure that the materials you buy and the brands you work with have a genuine green mission.
Going green shouldn’t be an afterthought—it should be a way of doing business.
If you want to work with a sustainable, efficient hardware partner, look no further than Ryker Hardware. We are constantly working to ensure we provide the highest quality products at the best price.
Contact us now to start the green conversation!
]]>
Here are the 9 easiest, least expensive methods you can do yourself over the weekend to enhance your home’s appearance, atmosphere, and value.
1. Repaint.
Painting is the simplest and most cost-effective home improvement. Despite its low cost and time, repainting is incredibly effective at enhancing the value of your home. Recently painted rooms look cleaner and updated, which appeals to homebuyers who want a “fresh” home.
The average cost for a gallon of paint is only $25. You’ll also need to buy rollers, painter’s tape, drop cloths, and brushes.
Opt for light, neutral colors that appeal to a wider audience. A neutral palette can also help create a more open feel that flows between your rooms. Neutral colors also allow purchasers to envision themselves making a home in your house. Good neutral options include pewter, beige, off-white, mauve, stone, and muted tones.
Learn how to paint a room with This Old House’s pro painting video.
You should also consider repainting the outside of your house. Curb appeal is important to homebuyers (and your neighbors). The way your home looks from the road can make or break your home valuation. A fresh coat of external pain can instantly make your home “pop” in a way that will stand out an attract buyers.
2. Rip up carpet.
Carpet is quickly fading in popularity. Not only is it outdated, but it also gets dirty and smelly—which can quickly devalue your home. Carpet is notorious for breeding bacteria, contaminants, and allergens that can ruin the quality of air in your home.
So rip out your old, smelly carpet and replace with hard flooring. Hard floors, especially freshly installed, tend to appeal better to buyers. Tile and laminate are allergen-friendly, easy to clean, and don’t have to be expensive. They’re also easy to install, so you can have fresh floors in just one weekend.
Hardwood floor adds the most value to your home, but wood can be expensive and it’s not easy to install yourself. However, you might actually have hardwood under your carpet. When you pull up your carpet, you’ll likely either have wood or concrete underneath. Both wood and concrete are easily fixed up to create a gorgeous, high-quality flooring that will can add value to your home.
To add warmth and décor to your hard floors, consider using a throw or area rug. These are a great way to pull a room together without committing to carpeting.
3. Say bye to popcorn ceilings.
Popcorn ceilings have become officially outdated and aren’t coming back anytime soon. When buyers see popcorn ceilings, they instantly feel the house is old and uncared for.
But it’s simple enough to get rid of popcorn ceilings. You need a softening solution and paint scraper, and you can easily pull the texture off in a few hours. Get more in-depth directions to remove popcorn ceilings here.
There are two things to note before removing texture from your ceiling. Any homes made before 1980 might contain asbestos. If you start scraping away at your ceiling, it can stir up the asbestos and release it into the air. If you have an older home, you might want to get your house inspected before making any changes.
Removing texture may also impact the paint underneath. After removal, you may need to repaint the ceiling, but a fresh coat of paint adds value and appeal anyway.
4. Fix up the bathroom.
Most homebuyers judge the quality of a house based on the cleanliness of the bathroom. Although replacing your bathroom overall can be a major expense, just a few inexpensive touch-ups can completely update your bathroom.
Some of the simplest bathroom fix-ups include:
5. Go green.
“Going green” can help cut down your energy bill drastically. Despite the initial upfront cost for some green fixtures, you’ll save a lot of money in the long run by reducing your energy bills. This especially appeals to homebuyers who want to cut down their expenses when looking for a new house. Plus, eco-friendly homes are only getting more popular as we’re becoming more aware of our global community.
You can opt for more expensive green options like solar power tiles, but this isn’t necessary to get cost-cutting benefits. Simple energy-efficient fixtures can help. Small green additions that will excite your homebuyers include:
Water filtration is also an inexpensive addition that will add a bit of luxury to the homebuyers’ experience. This cuts down on the cost of water bottles or having to deal with purifying pitchers.
These are small ways to cut costs, but they also show you care about the details of your home. Homebuyers like to see these small green additions because it tells them you’ve taken good care of your house.
Read: How 3D Printing Could Change The Future Of Construction
6. Enhance your front door.
Homebuyers decide whether or not they like a house within 7 seconds of entering a home. First impressions are critical, and this starts with your front door. Make sure you have a working doorbell; you may even want to install a Ring doorbell to show you’re an updated, secure house.
You might also want to install or update your awning or portico. People like this because they’re not fumbling around for their keys in the rain, snow, or heat. Adding a small deck or patio can also make the home more inviting.
Don’t underestimate how much paint can do here as well. Painting your door and siding can instantly enrich the curb appeal of your home.
Flower boxes are a small addition that makes a huge impact. You’ve seen flower boxes in pictures of small Italian villas, and the flowers make the house look inviting and homey—even if the villa itself isn’t the cleanest. That’s because flowers brighten and enliven the home, adding a cheerful detail that welcomes visitors and homebuyers.
7. Update landscaping.
Like flower boxes and your home entrance, your landscaping can instantly improve your curbside appeal—which increases your home value. Add color and greenery to make your home look more inviting to passersby.
But you want to make sure the landscaping is done properly. Pruned shrubs show you care about your home, while overgrown plants indicate neglect. You also want to make sure you plant the appropriate vegetation. You want the plants to work well with your geographic area, and they should require little water and maintenance. (You don’t want to use plants that will add more work to your house. The goal is to lower the everyday maintenance of the home.)
8. Repair outdoor fixtures.
Cracks in your pavement or driveway? Worn, faded decks or patios? Fix them up!
Homebuyers are more willing to make renovations inside the home than outside. If they see that your driveway is cracked, your deck is falling apart, or your lawn is destroyed, they might instantly be turned off because they don’t want to incur that expense.
A simple crack repair and re-staining of your deck wood can instantly update the look of your house. If you show that you care for the external features—even against the weather and elements—it shows that you care about your home overall.
9. Brighten your house.
Buyers today want “open concept” homes because they feel larger and cleaner. But you don’t have to pull down all your walls in order to sell. The best way to open up your house is to focus on lighting and space.
Add more lighting to make the space brighter and more cheerful. A well-lit room also shows that you have nothing to hide. Add in standalone lamps and bedside tables or hire an electrician to add recessed lighting overhead. Make sure you’re using modern fixtures with low-energy bulbs. Dimmers also go over well with homebuyers.
Next, get rid of closed, heavy draperies that make rooms feel dark. Light, airy curtains or vertical blinds and shutters can create an open feel for the room. Large mirrors can also make the room feel bigger by giving the illusion of more space.
Get rid of clutter wherever you can. Organization is key to a strong open house. Simply adding a shelving unit or removing a piece of furniture can instantly enliven and open up the room.
Conclusion
You can boost your property value this weekend with just a few DIY tips and tricks. This will make you feel more at home, and it will appeal better to any potential homebuyers that come to visit.
Investing a few bucks here and there can instantly give your home a facelift.
Are you a DIY pro? Give us your weekend renovation tips in the comments below!
]]>
Gone are the days of simply 3D printing a plastic pen for its novelty. Even the construction industry, which is historically conservative and slow to change, is quickly adapting with the use of digital fabrication technologies.
How is 3D printing impacting the future of construction, and what does this mean for the building industry moving forward?
The basics of 3D printing
3D printers make physical objects using a digital model of that object. So, an architect could input a model of a door in their computer, and the printer would physically create that exact door in the architect’s chosen materials.
3D printing was first used to create small-scale models of larger buildings. Now, 3D printing has taken on more advanced uses. These printers can make molds, components, objects, or even entire structures.
So far, 3D printers have successfully built small office buildings and houses. WinSun is a Chinese 3D printing company that has already printed several batches of houses and a few office buildings. Their construction of a 2-story 1,100 square meter villa took only one day of printing and two days of assembly, and it used 60% less waste and 80% less manpower than typical construction.
There are a number of companies with larger projects in the works as well. For example, MX3D is a Dutch startup that’s working to print a fully-functional stainless steel bridge that will be installed over one of the oldest canals in Amsterdam.
3D printing is eliminating some of the greatest traditional concerns with the construction process, including cost, time, efficiency, and manpower.
What are the key advantages and potential concerns for 3D printing in the construction industry?
Advantages of 3D printing in construction
1. Reduced costs
The most significant advantage of 3D printing is its overall reduced costs. It lowers expenses associated with raw materials, labor, and time. In fact, WinSun estimates that 3D printing can create up to 50% savings on the cost of a house construction project.
First, 3D printing reduces supply cost. It actually wastes less material and can use recycled resources to print. This saves money on the procurement of supplies, especially with regards to natural resources like lumber. Estimated savings on building materials can be as high as 60%.
Second, 3D printing minimizes the need for manpower. Labor is one of the highest costs in the construction industry, but 3D printing can do the work of a number of men (and in a shorter period of time). Laborers are just needed for assembly and final touches. This might actually save between 50 and 80% on the typical costs of manpower on site.
Third, 3D printing drastically reduces the time it takes for a construction project. Printers can work throughout the night without breaks or other labor regulations. What could take a construction team weeks or months can take a 3D printer a matter of days. This time saving means construction companies can take on more projects at a lower overhead cost.
For example, WinSum printed a 3D office building in Dubai in May 2016. After assembling the printer on site, it only took 17 days to print and 2 days to install the entire structure. The interior design process actually took longer than the construction of the building itself.
3. Eco-friendly
As mentioned, 3D printing actually wastes less material during production. The printer only uses the exact amount of material needed to print a given structure. You’re not sawing off extra lumber or scrap metal that then has to go to waste.
Moreover, the materials used for 3D printing are often made from recycled materials. For example, the cement used might be made from old sand, cement, and even paper fibers that were leftover from other projects.
The printed materials used to construct the building are themselves recyclable as well. This means that after the building is no longer needed, the materials can be broken down and reused at nearly 100%. (Because of this recyclability, a lot of builders are starting to consider creating pop-up shops that they can print and pull down as needed.)
Plus, 3D printing cuts down on energy expenditure during the building process. The electricity on a construction site is typically one of the most astronomical aspects of the building’s overhead, but 3D printing gets rid of this completely. In fact, the Association of Construction and Development estimated that 3D printing consumes 40-60% less energy than a typical job site.
This green construction is great for the environment and for the wallets of builders and clients alike.
3. Increased safety
With a reduced need for labor and the flexibility of 3D printing, the risk of serious injury on the job site reduces drastically. 3D printing can be used for more dangerous tasks, like constructing structures with heavy materials and assembling more intricate designs. Removing humans from the riskier processes minimizes the potential for liability, costs, and serious danger associated with construction-related labor.
Along with improved safety, removing humans from the construction process also removes the potential for human error. This both minimizes potential costs and protects users of the building moving forward. 3D printing technology is more likely to reliably create sturdy, well-constructed buildings time and time again.
4. Enhanced project planning
3D printing has been used to make small-scale models and replicas since the 90s, but the technology is even more advanced today. These printers can quickly and effectively create perfect-scale models of what a structure’s architecture, design, and functionality would look like. These models are more accurate and more cost- and time-effective than handcrafting.
This not only creates a visual representation of the project, but it also helps pinpoint problem areas, which can help avoid delays before the construction even begins.
5. Design enhancements
3D printing actually allows architects to be more flexible in the shape of their designs. Because printers can create molds, individual components, and entire structures, gone are the days of linear shapes. Architects can now defy gravity and bend the laws of physics with 3D printer’s movable and rotatable robot arms.
The conventions of construction are quickly changing with 3D printing, and space-age building designs are closer than we think.
6. Global development
Because of the lowered costs, eco-friendliness, and improved safety and efficiency, 3D printing is making homes more accessible and affordable. This is allowing construction organizations to start expanding their offerings globally at a reduced rate.
This is especially showing major advancements and successes in underdeveloped areas and third-world countries. 3D printing is allowing builders to provide homes and structures to societies that have never before had access to these kinds of resources.
Bringing affordable homes globally is going to show incredible advancements in the overall improvement of our world.
Concerns with 3D printing in construction
Despite the advantages of 3D printing, the construction industry is still hesitant to make 3D printing wide scale. It could have such significant and drastic impacts on the industry that it’s making some builders hesitant and nervous.
One of the biggest concerns of 3D printing is that it could potentially make the construction worker partially extraneous. As discussed in the advantages, 3D printing can improve safety and reduce costs—primarily because it removes the worker from the equation.
This doesn’t mean that construction workers are a thing of the past. However, reduced labor costs might mean that there are fewer employment opportunities in an industry that currently employs over 10 million people in the U.S. This might show major changes in the unemployment rate for the construction business.
Thus, contractors are going to need to figure out how to make workers relevant when paired with this new technology. Likely, workers will become more advanced and skilled. Physical labor will become more intricate and strategic.
Moreover, there are still some logistical concerns with 3D printing. Transporting or assembling large printers can be highly costly and dangerous. It can also be challenging to protect these printers from weather and theft while on site.
Some capacities of 3D printing are still up in the air and need to be explored further as 3D printing continues to become more popular.
The future of 3D printing
You might be adding a 3D printer to your workspace sooner than you think. Whether used to build singular components or entire structures, 3D printing is quickly gaining momentum in the public and private sectors of construction. It can help reduce costs, enhance efficiency, increase safety, and improve designs.
But how 3D printing will actually affect the future of the construction is still unclear. Its impact on laborers and client relationships is yet to be seen… though its major gains are not to be ignored. It’s critical to stay educated about the industry in order to stay ahead of the curve with these changing technologies.
How do you think 3D printing will impact the construction industry? Leave us a comment below with your take!
]]>
So how do you choose the right saw blade for smooth, safe cuts? What do you need to consider when purchasing a blade for your toolkit?
1. Type of tool
First, consider the type of tool that you’re using with this blade. The four main types of saws are the table saw, radial-arm saw, chop saw, and miter saw.
Some blades are designed for a particular type of saw. It can be dangerous to use the wrong blade with your saw. For example, an oscillating tool requires an oscillating saw blade, while Sawzall blades work well for all-purpose chop sawing.
Check the saw’s manufacturer instructions for the type and size of the recommended blade. You’ll also need to consider the power of the tool.
2. Type of cut
Blades are usually broken down into three main categories based on how they cut the wood:
The type of cut that you’ll want to use depends on the material you’re working with as well as the type of project. A crosscut blade has more teeth and makes more individual cuts, so it moves through the wood smoother and at a slower rate. This typically makes it better for projects that require flat, even edges. A ripping blade has fewer teeth and moves more quickly, so it removes more material at a faster rate.
When selecting your blade, keep in mind whether you want an all-purpose blade or a specialized blade. It can take a while to change blades in between the project, thus, combination blades are often better for general use because they’re designed to do both crosscutting and ripping.
However, sometimes you may want to have specialized blades that focus on one specific type of cut to move faster or smoother.
3. Materials
What material are you cutting into?
Consider which materials you work with most frequently. Cutting into metal is different than cutting wood or plastic. Furthermore, cutting wood lumber is different than cutting wood panels.
You want to consider the type of material and how you’ll cut it. Materials include wood, metal, plastic, laminates, melamine, and non-ferrous metals.
Different blades work well for different projects. For example, BiMetal blades work well for metal and wood, while HCS oscillating blades are better for wood and plastic.
Read: Which Saw Blades Are Best For Wood, Plastic, And Metal?
4. Number of teeth
The number of teeth on your blade will determine how it will cut a specific type of material. Blades with more teeth generally have a smoother cut, while blades with fewer teeth have a rougher cut but remove material faster.
For example, a blade with 24 teeth is often used to quickly rip cut lumber for a rough foundation project that doesn’t require smooth edges. A woodworker may then switch to a blade with 80 teeth to finish off the project with a smoother crosscut that won’t splinter or tear.
5. Gullet size
The “gullet” is the space between each tooth. This is used to help remove extra material as it is cut away.
Ripping blades cut at a faster rate and the tooth size is bigger. This means that the gullet needs to be deeper to handle the greater amount of material being removed.
Crosscutting blades have smaller teeth and cut less material, so the gullet can be much smaller. Often, the gullet will be purposefully small to ensure that the feed rate isn’t too fast for the crosscutting blade to handle. This keeps it smooth and steady, especially with radial-arm saws or miter saws.
Overall, large gullets clear out more material that’s generated during ripping, while smaller gullets help slow down the feed rate during crosscutting.
6. Tooth shape
The shape and grouping of the teeth will determine how it cuts, especially with regards to ripping or crosscutting.
Flat-Top (FT) teeth have a flat top, so they’re best for roughly ripping wood. It’s the most effective design for cutting and pulling away extra material as it cuts.
Alternate Top Bevel (ATB) has blade teeth that alternate between right- and left-hand bevel. This allows for a smooth, knife-like crosscut for natural woods and veneered plywood.
High Alternate Top Bevel (Hi-ATB) is used for extra-fine crosscutting, like melamine and laminate. It has a strong hook angle with larger gullets. The high angle makes it like a sharp knife at the edge of the blade, creating exceptionally smooth results.
Combination Tooth (Comb.) works for both crosscutting and ripping. It has a grouped tooth configuration consisting of four ATB teeth and one FT tooth. There are small gullets between each tooth and larger gullets between the groups of teeth.
Triple Chip Grind (TCG) alternates between a flat raking tooth and a higher trapeze tooth. This makes it the best choice for cutting hard materials like laminates, plastics, and metals.
7. Tooth hook angle
The angle of the tooth will also impact how it cuts. Most saw blades have the teeth tipped forward or backward rather than perfectly aligned. This creates less friction and has a stronger cut.
A positive hook angle is when the teeth are tipped forward, toward the direction of the blade’s rotation. A blade with a positive hook angle will create a faster feed and more aggressive cut. A blade made for ripping lumber will generally have a high hook angle.
A negative hook angle is when the teeth are tipped backward, away from the direction of the rotation. A blade with a low or negative hook angle slows down the feed rate and smoothens the cut. For example, radial-arm saws would have a negative hook angle to offset the faster feed rate of the powerful saw.
If the teeth are perfectly aligned, it’s considered a 0-degree hook angle.
8. Kerf width
The “kerf” is the thickness of the blade. A full-kerf is 1/8” or greater, and it’s typically used on saws with 3hp or greater power motors. A thin-kerf has a blade thickness of less than 1/8”, and it’s better for portable or smaller table saws with a power of less than 3hp.
Full-kerf blades take a wider bite and remove more material at once. These are preferable for larger projects like cutting lumber.
Thin-kerfs remove less material than full-kerfs, so they require less power to operate. They also move at a slower feed rate without getting bogged down or building friction and heat. This creates less damage to the material and less wear on the saw. It also wastes less of the material.
The concern with thin-kerf blades used to be that they would vibrate at higher speeds because they were so thin. However, tech advancements have made thin-kerf blades more durable with vibration dampening systems. Today, thinner blades are often the preferred choice for most projects.
9. Tooth quality
There are two primary types of teeth: bi-metal and carbide.
Bi-metal saw blades make an aggressive cut, so they work well for larger projects. They’ll even cut through nails or other harsh materials as it goes. These are less expensive than carbide, but they don’t last as long. This is good for an at-home DIYer or for professionals looking for rough-cut blades.
Our BiMetal Japanese saw blade gets the best of both worlds. The BiMetal creates a rougher cut while the thin Japanese style allows for smooth, even strokes.
Carbide tips are higher quality and are fused to the steel blade plate. They last significantly longer than bi-metal, so long-term the cost is cheaper. These are the preferred option for most professional woodworkers.
Our HCS Quick Release blades are great for multi-use saws.
10. Blade coating
You’ll also want to consider whether your blade is coated or uncoated. Learn more about how to choose between coated and uncoated saw blades here.
Conclusion
Selecting the right blade can feel like an overwhelming process. There are a lot of factors to consider, and each project may have its own cutting needs.
Still not sure what blade is best for your toolbox?
Send us a message for a quick reply! Ask away, and we’ll make sure you find the perfect blade for your upcoming project.
]]>
When selecting a saw blade, the first and foremost distinction is the material you’ll be cutting. Cutting through wood is obviously much different than glass or steel.
You can use the same circular saw for multiple jobs by simply switching out the blade. But which blades do you need in your blade-box?
In this article, we’ll go through the basic blade types that work best for the different materials you’ll likely come across on the job. Keep in mind that each of these blades also has variations based on the type of cut, the project, the speed, and other factors.
Below are the types of materials (in the order we’ll discuss their associated blades):
1. Wood cutting blades
A variety of woods call for a variety of cuts. There are three types of basic wood blades that we switch through, not only because of the material and thickness of the wood but also the type of cutting (straight edge versus joint).
Construction blades are made for fine cutting of lumber wood. They have usually around 40 or more teeth. They have deep gullets in between the teeth to remove chips and sawdust during the cutting process. They’re either high speed steel or carbide tipped depending on your budget and needs. They’re sometimes referred to as “carbide tipped saw blades.” These blades cut in a counterclockwise direction, so you typically want to cut from the backside of the board to get a smooth cut.
Plywood blades have more, smaller teeth, often numbering up to 160 teeth per blade. This allows for a cleaner and smoother cut while generating less dust. Because the teeth are so close together, more of the blade touches the wood at once so it can cut straighter. Plywood blades are usually made of high speed steel and can come coated or uncoated. These work for wood materials no more than 3/4 inch thick, like plywood and laminate.
Dado blades are used to make grooves, dadoes, and rabbet cuts in lumber. It’s a circular blade that can make groove cuts of various widths, so you can fit wood pieces together to create a joint. These are usually adjustable depending on the size of the chip and grooves.
Crosscutting blades are used to cut across the wood grain at a right angle. These typically have more teeth and a smaller gullet (area between the teeth) to create a smoother cut. These work best for finishing work that needs a smoother, more finished edge. Crosscut blades cut like a knife. Hollow ground blades are a type of crosscutting blade that makes smooth, careful cuts across wood.
Ripping blades cut parallel to the wood grain to create a deeper cut. These tend to have fewer teeth and large gullets, so they’re best for general carpentry work. The front edges of the teeth are flat without an angle, which allows for a straight cut along grain lines. Rip blades cut like a chisel.
Combination blades, also referred to as “all-purpose blades,” can both rip and crosscut wood. They’re highly versatile for a variety of woodworking applications, so we recommend them for every professional’s blade-box.
2. Plastic cutting blades
Plastic cutting blades, also called “acrylic cutting blades,” are similar to wood cutting blades, but they typically have more teeth. Wood blades average around 40 teeth while plastic blades have around 60. They cut through plastic, acrylic, and soft, non-ferrous metals. For Plexiglas, you’ll want a fine blade with at least 80 teeth.
Tip: Cut into plastic and soft materials slowly. If you go too quickly, the material can “catch” on the saw blade, which can damage both the blade and the project. You’ll want to cut with a smooth, pushing motion.
3. Masonry cutting blades
Masonry cutting blades, also called “abrasive blades,” are used to cut stone materials. These blades are usually toothless, so more of the blade touches the stone for a stronger cut. They’re usually made of fiberglass-reinforced silicone carbide. (This is the same material commonly used in sandpaper.)
There are two main types of stone blades based on the density of the stone being cut.
Coarse masonry blades are made for softer materials like concrete blocks, bricks, and limestone.
Diamond blades cut concrete, marble, granite, ceramic, and glass materials. These are usually the strongest types of blades.
Tip: When cutting through stone blocks, you’ll want to start with a scoring cut that’s about 1/4 inch deep. Then, tap a cold chisel along the cut. This usually splits the material along the scored line for a smoother, easier cut.
4. Metal cutting blades
Metal cutting blades are usually toothless to create a smooth cut through strong metal. They often have heat expansion slits to help dissipate heat while cutting into heat-conducting materials (like metal). Most metal cutting blades are versatile and can cut both ferrous and non-ferrous materials like brass, bronze, copper, aluminum, and light-gauge steel.
You might want to purchase a separate steel cutting saw blade specific for cutting steel. These are carbide grade, so they resist breakage, and they tend to last longer than other metal cutting discs.
5. Panel saw blades
There are specific blades made for cutting “panels” of materials. These are used to create larger boards or sheets, like for cabinets and signs. These blades can cut through melamine, plywood, aluminum, plastic, wood, laminates, and veneer. They typically cut through thinner layers, up to 3/4 inch.
Often, you’ll want to cut the material down using another type of material-specific blade. Then, you can use a panel saw blade to cut it into the shape of the sheet you need.
6. Demolition saw blades
Demolition saw blades are made for “demolition.” They cut through most materials, especially stronger and more durable ones. They create harsh, rough cuts, so they work well for fast cutting that doesn’t require a smooth or finished edge. These can cut through just about anything including roofing, shingles, nails, and non-ferrous materials.
Note about kerf
The “kerf” refers to the thickness of the blade. The thickness will determine the blade’s ability to cut through certain materials. It will also determine how it cuts through the material.
The thicker the blade or “kerf,” the more you can sharpen the blade. This means you can typically get more use and longer lifespan of thick kerf blades. However, thick kerf blades tend to create a harsher cut. These work well for high-powered saws for larger carpentry projects.
Thin kerf blades are sharper and cut faster. They also require less work from the saw because they cut less wood at once. It also wastes less of the material being cut, which saves you money in the long run. These work best for low-powered saws and detail work.
When selecting your blade, you’ll want to look at the teeth and kerf.
Conclusion
Your circular saw blade can be the most versatile tool you own if you use a variety of saw blade types. You’ll want to select your blade type based first and foremost on the material you’re cutting as well as the type of cut you want to create.
Not sure which blades are right for your saw and projects?
Contact Ryker Hardware now for a consult about your cutting project.
]]>
If you’re in the camp of professionals with a messy workspace, it’s time to create a foolproof organizational system. A workspace needs more than just ongoing cleanings. You need a process that makes it easy and streamlined to keep it organized, no matter how many workers are utilizing the space.
Having a clean, structured workspace makes you more efficient and productive because you can find items faster and have more space to work. In fact, studies show that a clean workspace creates better focus and productivity. It also improves safety because tools aren’t lying around out of place.
So what can you do to organize your workspace for a more streamlined and effective business?
1. Go through everything.
The first step is de-cluttering and categorizing. Unpack all the boxes and drawers in your workspace. Take out everything you find and put into three primary categories: keep, donate/sell, or throw out.
Within the “keep” products, you may want to further categorize and sort by similar items. For example, you might have a garden and lawn pile, a saw blade pile, and a small tools pile. You could also consider sorting by usage: which items do you use daily, weekly, monthly, or yearly? This can help you create the most streamlined workspace by storing items based on their frequency of use.
You may also want to create a list of tools that you write down as you sort. This is a great way to create an inventory for insurance and business purposes, and it makes it easier to organize in the future steps.
Tip: Make sure you label the piles as you go so you don’t forget.
While sorting, look for items that are rusted, corroded, or damaged. Determine whether they need to be sold, disposed of, or repaired.
2. Repair items.
Before throwing out items, consider if any can be repaired. Repair is usually cheaper than replacement, and proper maintenance can make your tools even better than new!
Create a separate pile for items you’ll want to be repaired. Address these repairs quickly, so the damage doesn’t worsen with time and reorganization.
If they can’t be repaired, you’ll likely need to replace them. Create a list and include these tools in your storage plan. You want to make sure to remember to include the items to be repaired and replaced so you don’t overstuff your workspace while planning for storage.
3. Get rid of what you don’t need.
Anything in the "donate/sell" or "toss" piles should go immediately. Don’t wait around to get rid of these items. The Law of Diminishing Intent says that we lose steam over time - the diminished motivation to do even the simplest of tasks can be the downfall of an organized workspace. If you wait to throw out some of your tools, you may never get around to it. They’ll end up back in your workspace causing more clutter and disorganization.
A lot of the tools you throw out can actually be restored or recycled. You can bring metal components to a scrapyard, which gives you some cash and helps keep landfills clear. Old batteries and electronics can be sold to repurposing facilities. If you can’t recycle your items, you may need to bring them to a hazardous or specialty waste facility.
Not sure how to properly and safely dispose of tools? Contact Ryker Hardware for more info.
4. Create a storage plan.
Imagine walking into your workspace. What do you need to reach first and most easily?
We usually recommend organizing based on usage. The items that you use most, like multi-tools, often should be the easiest to access.
When creating your storage strategy, consider the floor plan. Don’t forget about ceilings and walls, which can give you extra storage space. You’ll want to consider how different storage systems will work together. For example, you may want to use pegboards on the walls to store bigger items, drawers with organizers for smaller items, and plastic bins on shelving units for batteries.
You might also want to consider what would look most appealing in the space. Your workspace should make you feel comfortable. If you invited clients into your workspace, what would you want it to look like? The better your workspace looks, the more likely a client will hire you because they’ll think you are organized and professional. Looking through your clients’ eyes can help you create an attractive, streamlined storage space.
Tip: While creating your storage plan, use painters’ tape to label different areas around the garage. This will help you visualize the look and feel of the flow of the workspace. You may even want to lie out tools where they’ll go to get a general idea of what it will look like.
5. Install storage systems.
Based on your plan, you’ll need to use different systems. Thankfully, it can be easy to make your own storage units for your workspace. Below are some of our favorite DIY storage systems.
Wall pegboard: This takes all of your tools off the floor while easily and visually organizing tools. Pegs in the board are easily adjustable, so you can simply change your storage based on the lineup of your tools. It also helps you quickly see which items are missing at the end of the workday. We especially like steel pegboards, which are inexpensive, easy to clean, and look great. Learn how to install a pegboard wall with the DIY Network here.
Magnetic strips: Install a strip of magnetic tape on the wall or inside of drawers. This holds smaller tools like screw heads and drill bits. It keeps these smaller parts organized and handy, so they’re quick and easy to get to.
Blade organizer: Saw blades can be dangerously sharp, so you want to keep these especially organized. You don’t want a worker reaching their hand in and getting cut on the edge of the blade. Check out this awesome DIY table saw blade organizer.
Metal shelving: Every workspace needs a set of metal shelves that are easily accessible. This is a great way to store drawers, bins, and horizontal items. Do not get rolling shelves, as this can be unsafe; stick to stationary shelving units and keep a step stool nearby.
Plastic bins: If you’re a professional, you’ll typically want to keep paperwork in your workspace. You want easy access to user manuals, manufacturer instructions, and client contracts. Storing these in organized plastic bins protects your paper from dust and dirt. Plastic bins are also great for organizing tools that are still in their cases and protect metal from the air, which can cause corrosion and rust.
Tape dispenser: If you use duct tape in your workspace, a tape dispenser is a great way to keep these organized and easily accessible. It’s a small change that will drastically impact your workflow! Check out how to create your own DIY tape dispenser here.
Ceiling storage: Don’t forget about all that space on your ceiling. Install sturdy racks that can hold plastic bins of items you don’t use as often. Make sure you don’t store loose tools on the ceiling.
6. Get help.
You’ll likely want help from another person throughout this organization process. They can help you manufacture your DIY projects and install shelving. They will be a second pair of eyes to see if your storage plan is missing anything or isn’t completely efficient.
A few more people on your team can help make the project faster and more productive.
7. Put things in place.
The hardest part is actually putting items in place. Sometimes the plan doesn’t go according to plan, and that’s okay. Be flexible and work around it. Take your time and don’t rush through it.
Putting that last tool in its place is one of the most satisfying feelings!
Conclusion
Cleaning your workspace can feel like a stressful undertaking. But a couple hours focusing on organization can save hundreds of hours in efficiency and productivity moving forward.
If you’re not sure which tools you need or how to properly store them, contact Ryker Hardware for more info.
]]>All saws—circular, table saw, miter saw, and radial arm—come in a variety of materials, constructions, teeth, and tapering. Nevertheless, whether or not these blades are coated is one of the biggest questions to consider before investing in a new blade.
Below, we’ll go through the pros and cons of coated versus uncoated blades—and how to choose which is right for your projects and toolbox.
Coated saw blades
Most saw blades are made from high-speed steel (HSS). Although it’s still a strong alloy, it’s considered a softer steel than high carbon steel.
A coating typically helps strengthen high-speed steel so it’s stronger and more durable. Hard coatings are usually made of substances like titanium, carbide, and materials.
Advantages
Because coating materials are so resilient, they theoretically produce a harder tooth edge. This creates less resistance and friction when cutting into harsh materials, which in turn leads to less dust and clogging with a smoother finish.
Moreover, the coating creates an even surface on the blade. This makes the blade slicker, so it can cut with less friction than HSS would. This is especially true when cutting into stone materials, which can cause steel blades to reach higher levels of heat, increasing the chances of malfunction or breakage.
Coated blades are also considered to be longer lasting. The coating’s robust substances make it more resistant to wear, scratches, and rust.
Drawbacks
In some cases, these coatings can actually have the opposite effect of their intentions. If the coating isn’t high quality, the friction while cutting strong materials can start to wear away the coating after several uses. The same is true of sharpening the blade. This can start to leave the blade only partially coated, which is aesthetically unappealing and can also expose the blade underneath to impairment.
Some brands of coated blades have a rough and unprofessional layer of coating. This can actually create more resistance, potentially leading to damage to the blade or the project itself.
Plus, coated blades tend to be more expensive. This increased cost is in exchange for the higher-quality materials used to strengthen the durability of the blade.
Advantages recap:
Disadvantages recap:
Uncoated saw blades
Uncoated saw blades are also referred to as “naked” blades because they don’t have any protective layer on top. The uncoated blade could be high-speed steel (HSS) or a stronger steel, like carbon alloy. Learn more about types of steel blades here.
Advantages
Because uncoated blades are naked, they can be sharpened over and over, and you’ll consistently see the same results. Since a sharp blade is always preferred, this is an important aspect to consider.
Without a coating, you don’t have to worry about any of the drawbacks of a coated blade. The coating won’t wear down, there won’t be undue resistance, and the blade won’t damage as easily during a project. It’s a simple and reliable choice.
Uncoated saw blades are also less expensive and more common than coated saw blades.
Drawbacks
Although the uncoated saw blade is traditionally the tool of choice, it has some disadvantages as well. If the blade itself is weak or poorly constructed, it won’t be able to withhold rigorous cutting for an extensive period of time. The strength of the blade will directly determine your project’s success.
Uncoated blades can also cause friction because they don’t have a smooth coating to create a level surface. This increased friction can slow down cutting times and increase dust and clogging. Softer steel blades also reduce sawing power.
Advantages recap:
Disadvantages recap:
Notes about coated vs uncoated blades
It’s challenging to decide whether coated or uncoated blades are right for you. Each professional has his own preference, and his preference may vary based on the different types of saws or brands he’s using.
Below are some tips to help make the decision easier.
Use a hybrid.
Some uncoated blades will have coated teeth or teeth made from a harder material. This allows you to get a stronger cut into the wood using the coated teeth, with a smoother finish with the uncoated blade. This kind of hybrid can give you the best of both worlds while minimizing any drawbacks.
Consider the construction.
The blade is only as good as its base. A hard coating won’t last long on weak steel. In reverse, a hefty steel blade may not need a coating (and actually works better uncoated). For example, titanium blades have unparalleled durability—with or without a coating.
Make sure you start with a quality blade from a strong company. The quality of the steel is the quality of the blade.
Purchase a carbon steel blade.
If you want the best quality blade, opt for carbon steel. Although most saw blades are made of some quality of high speed steel, carbon steel is a stronger steel alloy. High carbon steel is considered the best quality blade for a smooth, spotless slice in wood or stone.
Purchase saw blades that are made with high carbon steel:
Shopping tip: Look for “HCS”, which stands for high carbon steel.
Maintain the blade.
Always take care of your blade, especially if you’re using an uncoated blade. If you take preventative measures, either type of blade will be able to endure in your toolbox for years to come.
Below are our top blade maintenance tips, especially for uncoated blades:
Learn more about how to maintain your tools here.
Select the right brand.
Do your research before committing to a blade. The brand you choose will determine the quality of the steel, the construction of the blade, and the durability of the coating.
Contact Ryker Hardware for more info about our brand and blades.
Which is better: coated or uncoated?
Ultimately, how do you choose between a coated and an uncoated blade?
A number of professionals prefer uncoated saw blades because they’re clean and easier to use. If you maintain your blade well, you can keep these for years to come and also create stunning, smooth-edge projects.
However, despite uncoated being the popular opinion, a lot of us at Ryker actually prefer coated saw blades. That’s because Ryker coating is high quality, durable, and strong. Don’t be afraid of coating—see what works best for you.
But we know the decision can be tough. That’s why the Ryker 15 piece variety set of oscillating saw blades is the perfect solution. It comes with both coated and uncoated blades, so you can give both a try to see what’s most effective for your assortment of projects.
Still not sure which is right for you? That’s okay! Ryker Hardware offers a 60-day Money Back Satisfaction Guarantee to ensure you are always happy with your purchase. Check out our shop now.
Tip: You want our 15-piece quick-release oscillating saw blades. You get a variety pack of blades, so you’re well equipped for every project!
]]>You don’t want to purchase every type or brand of saw blade. They’re heavy, cumbersome, and (moderately) pricey. You want to invest in a few select saw blades that are versatile and most effective for your specific type of projects.
But with so many saw blades on the market, how do you know which ones are right for your business?
In this article, we’re focusing on the differences between Western and Japanese blades specifically. Check out some of our other resources to select other types of saws and tools:
There’s a lot to consider when purchasing a saw blade. Below are the basics to look for when you’re selecting between blades or brands.
There are other considerations as well, like tooth configuration, hook angle, kerf width, and quality.
Often, the type of saw you’ll need depends on the material and the project.
For example, plywood tends to tear a lot, making it more challenging to create a cleaner cut. This typically means you’ll want a high-tooth count blade for a smooth edge, and you’ll want to focus on rip cuts as opposed to the rougher crosscuts.
Pro-tip: Tooth count is the most important aspect to your saw blade. It has the highest impact on the cleanness of the cut. Generally, you should use less than 30 tpi (teeth per inch) for rip cuts, 40-50 tpi for combination, and 60 tpi for cross cuts.
Below we go through the most common Japanese blades in comparison with Western blades to give you a sense of which might work best for your project.
In general, Japanese saws (nokogiri) are less time-consuming and fatiguing than Western saws, because they are designed to cut on the pull, rather than on the push. Western blades usually cut on the push cut, which is actually a less natural movement. Once you get used to the pull of the Japanese saw, it’s often easier and less tiring. There are three main types of Japanese saw blades: dozuki, Kataba, and Ryoba.
The dozuki saw blade is a favorite for a number of woodworkers, and it’s the most commonly known Japanese blade.
Teeth: Dozuki blades come in a range of teeth size. Most are 22 to 27 tpi, which tends to create a rougher cut for pieces 1/8 to 1 inch thick. You can also find dozukis with large teeth (13 to 18 tpi) or small teeth (more than 32 tpi). Because of the thinness of the blade, smaller teeth can be harder to control with a dozuki blade. The teeth have small, angled tips that create a smooth and easy cut.
Cut: Crosscut dozukis cut with the grain and are better for general-purpose work. They’re less aggressive and easier to learn for beginners. Rip-cut dozukis make sawing across the grain easy, especially for dovetails. Due to its thin blade, it can only cut about 2” deep.
Thickness: Dozuki blades are very thin. These cut an extremely narrow kerf, removing nearly half as much wood as a standard blade. They have a blade stiffener (spine) that runs the length of the blade and the handle, but they’re typically not as sturdy as Western spines.
Length: Dozukis tend to come in two sizes: short (6 to 8 in) or long (9.5 to 10.5 in). Long blade dozuki saws tend to work best because they allow for a longer and smoother stroke.
Handle: Most dozuki saws have a long, narrow handle so you have more leverage. It’s usually wrapped in rattan (palm stems) for a more comfortable grip. Because it’s so lightweight, it can be held with one or two hands.
Cost: Dozuki saws average $40 to $50, but you can find expensive, artisan ones from Japan for around $100 to $200. These blades will stay sharp for a long time, saving money and time for replacement. However, these blades typically can’t be sharpened, so most require replaceable blades. Each replacement blade is made specifically for one brand of saw, so it can be challenging to get additional blades at a later date. The replacement typically costs half of the saw itself.
Check out our BiMetal Japanese Tooth Oscillating Saw Blade for a fast, precise cut for your wood projects.
The Kataba blade is much like the dozuki in all of the above characteristics, but it doesn’t have the stiffener (the spine of the blade). This means that it can cut deeper boards that are thicker than 2 inches. It is also typically thicker than a dozuki, so it works well as a general-purpose saw for a number of projects.
The rip-cut Kataba often has smaller teeth towards the rear of the blade to create a smoother start of the cut and then larger teeth near the front of the blade to speed up the process. This variation of teeth works together for precision and speed.
The Ryoba blade is a double-edged saw with cutting teeth on either side of the blade. One side has teeth made for crosscutting while the other has teeth for rip cutting. This makes it a more versatile tool for your projects.
Ryoba blades come in a variety of length, teeth, and thickness. Typically, the size and number of teeth will vary depending upon the length of the blade. These are usually thinner toward the middle and thicker at the edges to make for an easier cut.
Ryoba is a great blade to have in your toolbox because it’s lightweight and easier to carry, and one blade can do either a rip or cross cut.
Unlike Japanese saws, Western saws cut on the push stroke. These almost always have a blade stiffener or “back,” so they’re usually referred to as a backsaw. They tend to be thicker and sturdier than Japanese saws.
Teeth: Western backsaws generally have softer teeth than Japanese saws. This means when they get dull, you can file and sharpen them yourself. However, these teeth are often very small, so you want professional sharpening to ensure it’s done correctly.
Cut: Western standard or fine saws tend to produce a courser cut than Japanese saws, which isn’t necessarily a bad thing. You want a courser cut for a number of products, especially lard-scale or faster cuttings. Fine Western saw blades can create a thin kerf that works well for smaller projects as well.
Thickness: Western saws are typically thicker than Japanese saws, so they require more effort. However, this thickness ensures the saw doesn’t buckle while being pushed, which allows for strong durability and strength against even the toughest materials. If you’re working with stone, metal, or strong woods (like cherry), a thicker Western saw is often a good choice.
Length: You can find just about any length of Western standard saws. From log cutting to intricate woodwork, you’ll want to select the length of saw that corresponds to the project. If you’re looking for a tool for your collection, a standard to long saw blade is best.
Handle: Western saw handles can have an elaborately shaped grip for an easy, comfortable hold or they might have a simple turned knob. Most Western saws can be utilized with just one hand.
Cost: The cost of a Western standard saw is variable, but it typically ranges from $20 to $50. Check out some of our Western saw blades with durable, quality materials and fine teeth here.
Japanese saws are often lighter and thinner than Western saws. This makes them easier, faster, and smoother to use, especially for daily and multi-purpose use.
Nevertheless, most contractors prefer Western saws. That’s what their workers know and are comfortable using, and they’re best for finishing jobs quickly. Western saws come in a variety of teeth counts, thickness, and lengths, making them highly customizable based on your project needs.
Not sure which kind of saw is right for your project?
Contact Ryker Hardware with the info about your project or toolbox and we’ll guide you towards the perfect blades.
]]>Tool replacement, especially at a frequent rate, is one of the greatest expenses for any contractor or professional. Whether you’re replacing your hammers monthly or your floor grinders yearly, the cost of tools can quickly add up and kill your net profits.
Extending the life of your tools means minimizing your costs. The best way to extend the life of your tools is with proper tool maintenance.
Tool maintenance also makes the job safer, more efficient, and more effective—which will make you, your employees, and your clients happy.
So what should you be doing to care for your tools to save money, time, and resources for your business?
Cleaning tools after use and before putting in storage is a necessary habit for all professionals. A few minutes of tool TLC can protect from damage and save time when you go to use that tool again.
Start by wiping down the tools with a rag or old towel. This helps get rid of dust, grease, and debris, especially in tools with moving parts. Some professionals will keep a bucket of rags near storage so it’s easy and fast to wipe down tools before putting away.
You should also do a deeper clean periodically, after every few uses. Use a damp cloth to clean all parts of the tool, paying extra attention to moving parts and crevices. Dip a cotton swab in all-purpose oil to reach hard-to-clean areas. You can also use an air compressor or can of compressed air to blow air into vents and crevices. Make sure to dry the tool with a clean rag after washing.
Pro-tip: Always unplug tools after use. Do not clean, repair, or store tools that are still connected to a power source.
After cleaning, it’s a great opportunity to take a few seconds to look over your tools. You want to see if there are any defects or damaged areas.
Look for:
You may also want to turn on your power tools to make sure they start easily. If they don’t, add lubricant and try again. If they still don’t power up with ease, they may need to be repaired.
Pro-tip: Pay extra attention to power cords. We tend to look at the tool itself without considering its attachments or cords. But frayed insulation or exposed wires can cause electric shock or fire, which can create a high risk for your employees and business. Don’t mess with wires.
If there are any signs of damage, don’t use the tool. Using a broken tool can cause serious injury.
If you spot any of the above wear and tear, don’t store your tools with the idea that you’ll “fix it later.” Fix it now while it’s top of mind. You don’t want to put it away and forget that it’s broken for the next time you try to use it. Doing so can cause serious injury to the worker and complete damage to the tool.
Here are a few ways to quickly and effectively repair the most common damage concerns.
Remove rust. Use a rust remover or WD-40, and scrub with steel wool or a stiff wire brush. Rinse with warm, soapy water. Scrub again with a damp cloth or rag to remove leftover signs of rust. Dry with a clean rag. If this doesn’t work, you may need to soak the tool in rust remover overnight.
Tip: Make sure you wear heavy gloves because you don’t want to expose skin to rust. You should also wear safety goggles, especially when working with rust and steel wool.
Sand down wooden handles. Handles should be smooth enough to slide your hand on. If your wooden handles are rough and weathered, they should be sanded down. Start by sanding across the grain quickly, brushing back and forth. Use a rougher grit. Then, finish with a lighter grit by sanding with the grain. Wipe the handle with a coat of linseed oil to revive and protect the wood.
Sharpen tools. All bladed tools need to be sharpened once per season or when they start to get dull. This includes saw blades, shovels, pruners, and lawn and garden tools. If blades start to wear down, the power tool has to work harder to get the job done; this can stress out the motor and cause further damage to the parts. It also doesn’t do the job as well.
Use a coarse file working edge to a 45-degree bevel. You may want to invest in professional sharpening tools. Don’t forget to keep your sharpeners sharp as well.
For other sorts of repairs, like frayed wires, you may need to work with a repairman or the manufacturer to get it repaired or replaced.
Pro-tip: You should have a worktable near your tool storage. This is a place where you can inspect your tools and perform repairs safely and quickly. Cover it with newspaper or plastic sheeting to make it easier to clean up
After cleaning and repairing, you want to lubricate your tools. This helps prevent corrosion and rust, so they’re fresh and ready the next time you want to use them. You especially want to lubricate tools with adjustable or movable parts to ensure they don’t rust or harden into place.
You’ll likely want to use an all-purpose oil like WD-40. You can spray it directly on the adjustable parts of the tool for more powerful lubrication, or you can spray on a rag and rub on to help reach inside crevices and cracks.
You can lightly spray the oil other metal parts of the tool for extra protection.
Make sure that you wipe away any excess oil with a rag before storing.
After tools are clean, repaired, and lubricated, they’re ready to be stored.
You want to store tools in a cool, dry place. Keep them away from excessive heat or cold, which can damage tools, especially electronics like power drills. You also want to protect your tools from water or moisture, which cause rusting and corrosion.
The best way to protect from dust, dirt, and moisture is with a toolbox, chest, container, or shelving unit. You’ll want to keep the majority of your tools in an enclosed area rather than open and exposed. You might want to consider storing tools in their original boxes.
Each tool should have a designated spot where it’s stored easily and safely. This protects tools from the elements and ensures the safety of those using the tools. It can also help you quickly determine which tools are missing, in use, or being repaired.
Pro-tip: Put silica gel packs in the toolbox. This helps remove excess moisture to avoid rust and corrosion.
Batteries can be incredibly dangerous if they break or heat up. They can also be expensive to replace. If batteries corrode inside your tool, they can also cause damage to the tool itself.
After using your tools, remove the batteries and store separately. This can help ensure that batteries don’t break and damage your tools. Plus, some batteries can actually wear out faster if you keep them inside the tool, so removing them can help extend their life.
Store batteries in a cool, dry place. Moisture and extreme temperatures, especially heat, can cause serious battery corrosion. Even storing next to the tool they go with can work well.
Most power tools use lithium-ion batteries, which are known to overheat and fry. Keep these in controlled areas without temperature spikes, and don’t let the battery run down completely before recharging.
Power tools can quickly start to heat up, especially if they’re being overworked or kept running for too long. Make sure that you let your tool cool down if it’s getting hot, even in the middle of a project. This saves you from wearing out the motor or burning parts of your tool, which can cause fires, shocks, or expensive repairs.
Power tools are precision instruments. Using them for a while can cause them to lose alignment. This can cause damage to the tools or the project on which you’re working.
Check the instruction manual to see how frequently you should recalibrate your tool. You’ll likely need to recalibrate every few hours to avoid damage.
Always follow the instruction manuals for your tools with regards to lubrication, repair, sharpening, and storage. You’ll also want to follow these instructions for replacing exhausts, batteries, and filters.
You should keep all tool manuals with you. Store them in a folder or filing cabinet for easy access.
Read these manuals and encourage your employees to do the same to ensure the safest and most effective use of your tools.
Taking care of your tools is the best way to extend their life, save your wallet, improve efficiency, and protect your workers’ safety. Proper tool maintenance doesn’t have to be hard if you make these steps a habitual part of your daily routine.
Not sure how to implement these tool care tips into your workday? Not sure how to get your team on board?
Contact Ryker Hardware to work with a team of customer service professionals ready to provide insights for your professional business.
We look forward to hearing from you!
]]>